How to get started using and collaborating in Google’s online spreadsheet app.
Suebsiri / Savushkin / amtitus
Google Sheets is a powerful spreadsheet app that you use through your web browser. It stores your spreadsheets in the cloud with Google Drive. Anyone with a Google account can use Sheets and Drive for free. They’re also part of G Suite, Google’s subscription-based office suite for business and enterprise customers.
This guide will teach you how to start a new spreadsheet in Sheets or upload one you already have stored on your PC’s hard drive, including a Microsoft Excel spreadsheet. It also goes over the basic interface and unique features of Sheets, such as how to share your spreadsheets and collaborate on them with others.
In addition to the web app, Google offers a Sheets mobile app for Android and iOS. We’ll note any major differences in the mobile app’s interface and features.
Share this story: G Suite administrators, we hope you’ll pass this guide on to your users to help them get up to speed with Google Docs.
- Create or open a spreadsheet
- Upload a Microsoft Excel spreadsheet for editing in Google Sheets
- Work in a spreadsheet
- Manage multiple sheets in a spreadsheet
- Get suggestions for a spreadsheet with the Explore tool
Create or open a spreadsheet
You can create a new spreadsheet, or load one you’ve already saved in Google Drive, through the Google Sheets home page or the Google Drive home page. You’ll need to sign in to your Google or G Suite account if you haven’t already.
In Google Sheets: At the top of the home page you’ll see a “Start a new spreadsheet” header, with a row of thumbnails underneath. Below that you’ll see a list of Google Sheets spreadsheets you have stored in Google Drive or that are stored in someone else’s Drive and shared with you.
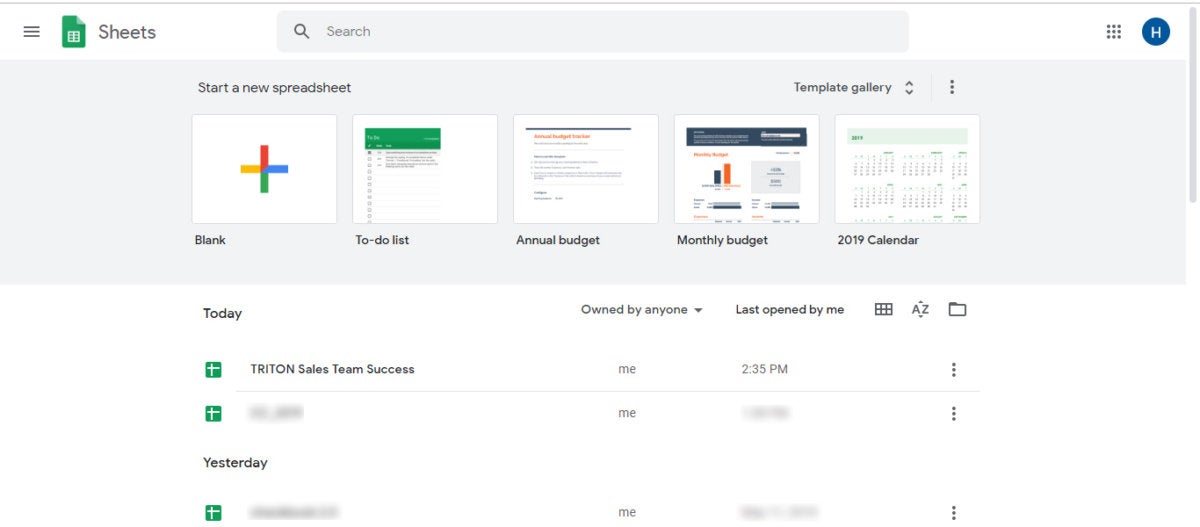
The Google Sheets home page. (Click image to enlarge it.)
To start a new spreadsheet, click the Blank thumbnail or select a template from the thumbnails to the right. To see more templates, click the “Template gallery” button in the upper-right corner of the screen; click any thumbnail to start a new spreadsheet in that template.
To open a spreadsheet stored in Drive, click it in the list below.
By default, the spreadsheets list appears in reverse chronological order starting with the spreadsheet you most recently opened. Clicking the “AZ” icon at the upper right of this list changes the sort order to “Last modified by me,” “Last modified” (by anyone with access to the spreadsheet), or in alphabetical order by spreadsheet title. You can also browse to a specific folder by clicking the folder icon next to the AZ icon.
Use the search box at the very top of the screen to search on a word or phrase; if it appears in a spreadsheet title or the body of a spreadsheet, it’ll appear in the search results.
In Google Drive: To start a new blank spreadsheet, click the New button at the upper-left of the screen and then click “Google Sheets.”
If you want to select a template to start a new spreadsheet, click the New button, then move the cursor over the “>” to the right of “Google Sheets” and select “From a template.” Google Sheets will open, showing its full template gallery; click a thumbnail to start a new spreadsheet in that template.
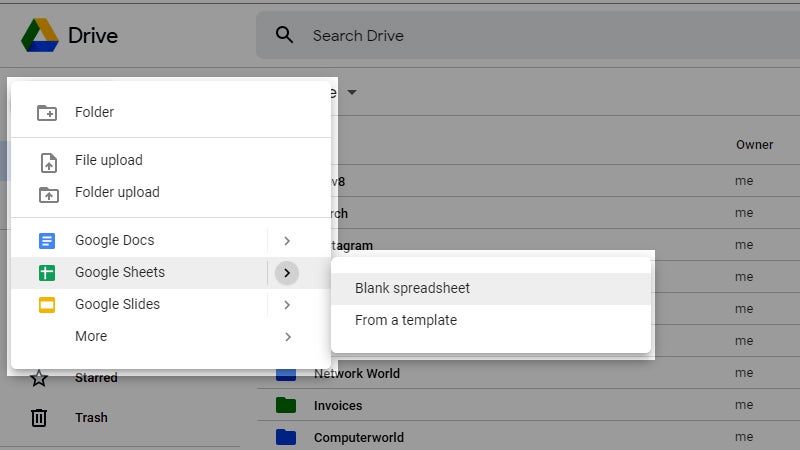
Creating a new spreadsheet in Google Drive. (Click image to enlarge it.)
To open a spreadsheet that someone else has shared with you via Google Drive, click “Shared with me” in the left column, then double-click the spreadsheet you want in the main listing area.
Alternatively, use the Search box at the very top of the screen to search for a word or phrase that appears in any spreadsheet you have access to in Drive, whether you own it or it’s been shared with you.
Upload a Microsoft Excel spreadsheet for editing in Google Sheets
If you want to edit a spreadsheet that’s not already stored in your Google Drive, you must first upload it to Drive. You can do this from either Sheets or Drive, but somewhat different things might happen with each approach.
From Google Sheets: To upload a file from the Sheets home page, click the folder icon above the spreadsheets list, then click the Upload tab on the screen that appears. You can drag and drop a file onto the screen, or browse your computer’s hard drive and select a file.
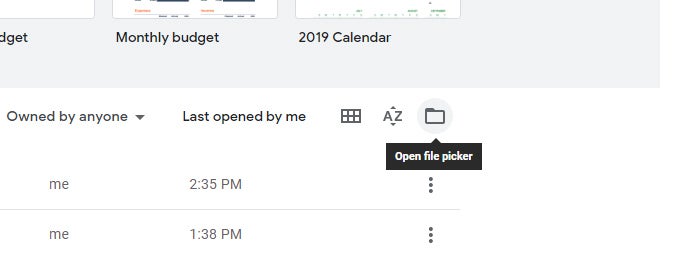
To upload an Excel spreadsheet, click this button.
If you upload a Microsoft Excel (.xls or .xlsx) spreadsheet, it’s automatically converted so that you can edit it in Google Sheets. It appears listed on your Google Sheets home page and Google Drive home page.
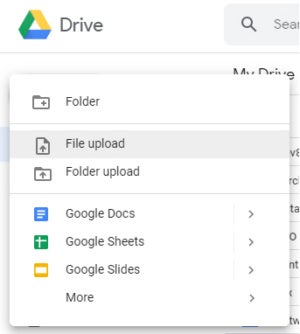 IDG
IDGUploading a spreadsheet in Google Drive.
From Google Drive: To upload a spreadsheet via the Google Drive home page, click the New button, then “File upload,” and select the spreadsheet from your PC’s drive.
Depending on how Google Drive is configured, Microsoft Excel files may or may not be converted to Sheets format. Click the gear icon in the upper-right corner of the Drive home page and select Settings from the drop-down menu. In the Settings box next to “Convert uploads” you’ll see a checkbox marked “Convert uploaded files to Google Docs editor format.” Check it if you want Excel files to be automatically converted to Sheets for editing, and uncheck it if you don’t.
Why wouldn’t you want to convert files to Sheets format when you upload them? Google announced a new feature at its Cloud Next conference in April: the ability to edit Microsoft Office-formatted files in Google Docs, Sheets, and Slides without converting them first. The idea is to make it easier for users whose colleagues use Office. Instead of converting a file to Sheets format and then back to Excel format to send back to an Office-using colleague, Sheets users can edit and collaborate on a native Excel file right in Sheets, with all changes made by you or your collaborators saved directly to the Excel file.
If you choose to upload Excel files in their native format, they appear listed on your Google Sheets home page and Google Drive home page with an Excel icon next to them instead of the usual Sheets icon.
 IDG
IDGMicrosoft Excel files show the Excel icon instead of the Google Sheets icon.
When you double-click an Excel file on the Drive home page, it opens in read-only mode. To edit it, click the “Open with Google Sheets” button at the top of the page; the file opens in a new Google Sheets browser tab. To open an Excel document from the Sheets home page, click it in the spreadsheets list and choose “Edit in Google Sheets.” To the right of the document’s title you’ll see a green .XLSX label. Any changes you make are saved in this original Excel-formatted file.
 IDG
IDGThe green .XLSX icon tells you that you’re editing an Excel-formatted document.
Work in a spreadsheet
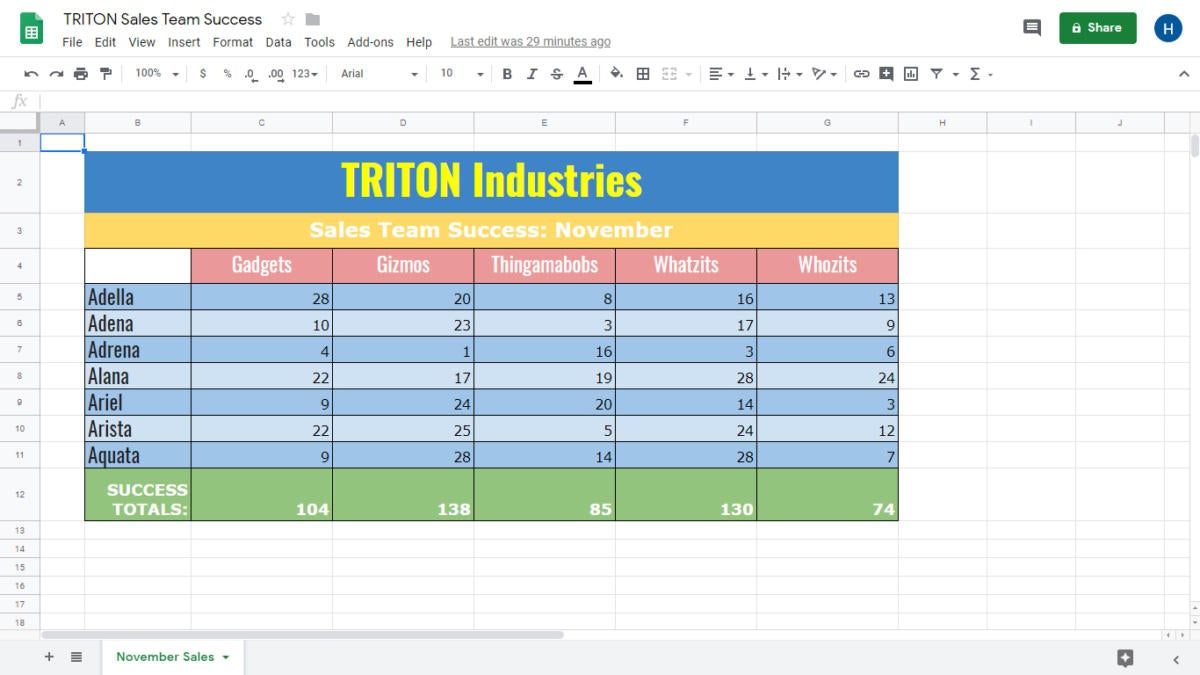
When you open a new or existing spreadsheet, you see its first sheet (or its only sheet if it doesn’t have two or more) in your browser window. The toolbar directly above your spreadsheet has buttons for formatting the numbers and text in a cell or cells that you’ve selected. These include changing the number format (e.g., currency, date, percent) and font (type, size, style, color). Other buttons on this toolbar include those for letting you change the background color of a cell, merging cells you’ve selected, and adjusting the horizontal or vertical alignment of numbers or text in a cell.
IDG
The Google Sheets editing interface. (Click image to enlarge it.)
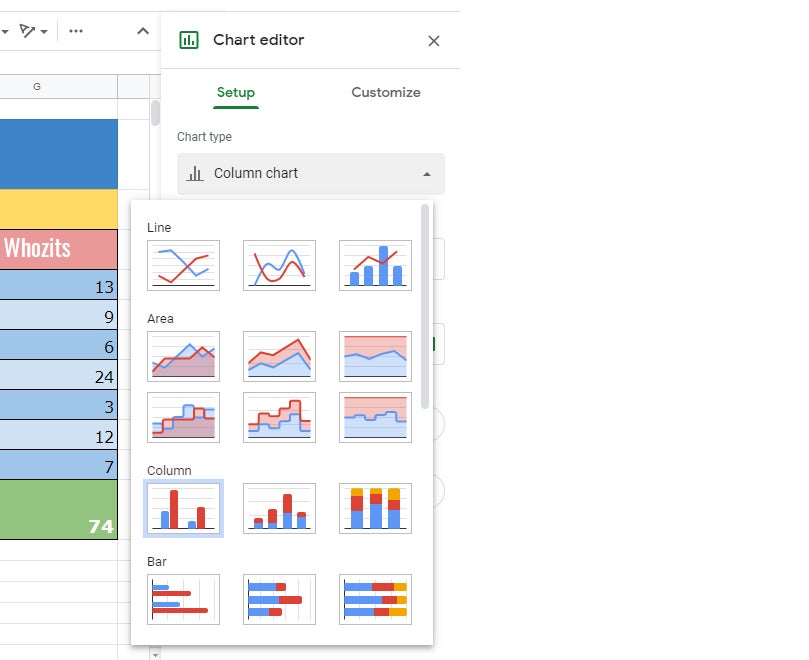
One important button to know on this toolbar lets you insert a chart onto your spreadsheet. Clicking the “Insert chart” button toward the right end of the toolbar opens a sidebar from which you can select 31 chart presets under the “Setup” tab, or you can create a chart on the “Customize” tab.
 IDG
IDGInserting a chart in Google Sheets.
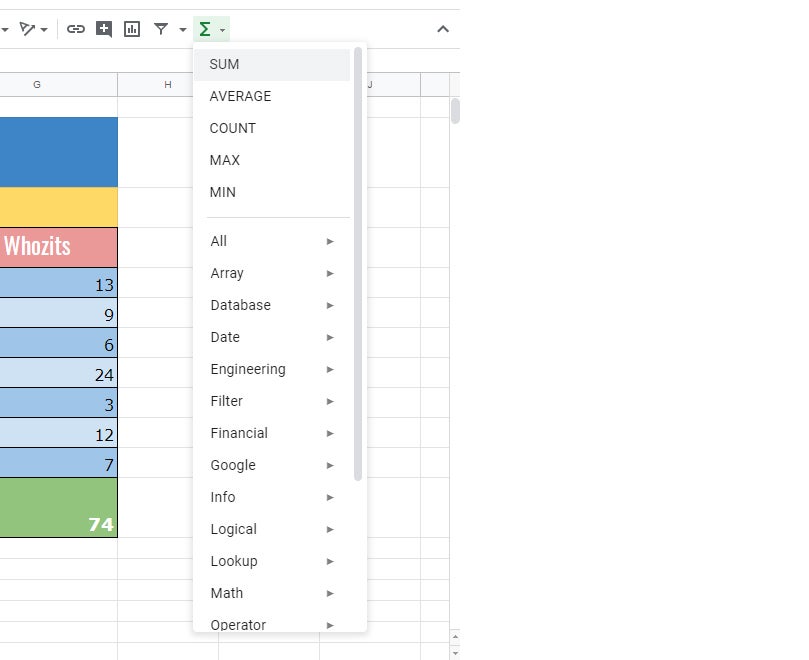
Clicking the “Functions” button in the toolbar opens a long drop-down menu of formulas (a.k.a. functions) that Google Sheets supports. Click through the categories to find the formula you want. Once you find it, click the formula to insert it into the cell where you’ve set the cursor. For a complete list of formulas/functions that work in Google Sheets, see the official Google Sheets functions list.
 IDG
IDGInserting a function in Google Sheets.
The menu bar above the formatting toolbar contains the same tools that are on the toolbar — and many more. The File menu has commands for taking action on the whole spreadsheet, including Print, Rename and Share. The Edit menu contains quick tools for deleting columns or rows. Insert lets you insert cells, columns or rows; graphical elements such as charts and images, and other items such as functions, comments, and checkboxes.
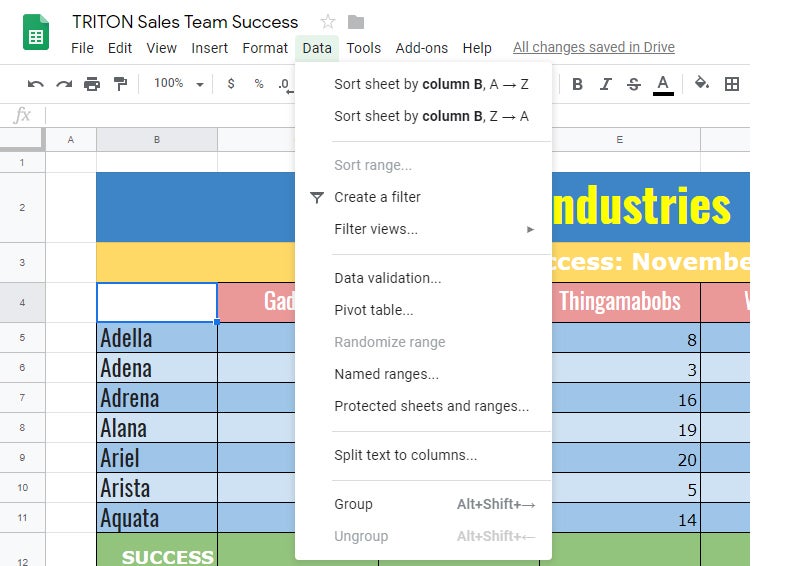
Format has the same tools as the toolbar, plus commands for conditional formatting and alternating colors. Data has tools that include sorting a range of columns in alphabetical order, creating a filter, validating data, showing data in a pivot table, and grouping together columns or rows. The Tools menu contains extras like recording macros and running spell-check.
[Also read: Windows 10 quick tips: Get the most out of Cortana]
 IDG
IDGThe Data menu includes tools for sorting, filtering, validating, and grouping data.
The spreadsheet’s title appears at the top-left of the screen, above the menu bar and formatting toolbar. To change it, put the cursor in the title and start typing — there’s no need to “Save as” under a different title. Sheets automatically saves any changes as soon as you make them.
 IDG
IDGRenaming a spreadsheet.
Manage multiple sheets in a spreadsheet
When your spreadsheet contains more than one sheet, they are represented as tabs along the bottom of the screen. Clicking one of these tabs shows you the corresponding sheet on the screen.
 IDG
IDGTabs along the bottom of the screen help you navigate between multiple sheets.
To add a new, blank sheet to your spreadsheet, click the “+” at the lower-left corner.
To move a sheet to a different place along the bottom row of tabs, click and hold onto its tab, drag it left or right to another place in the row, and release it.
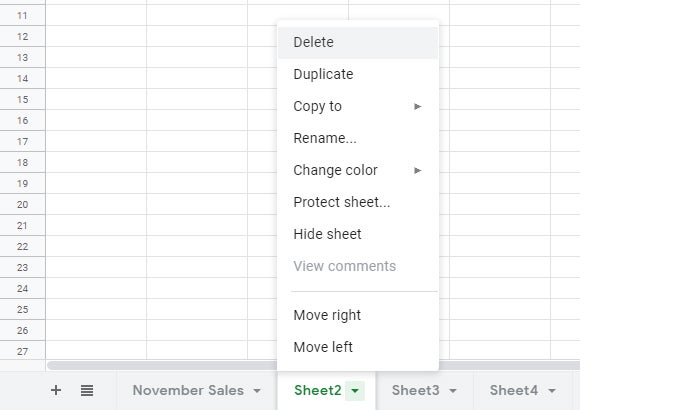
To delete a sheet, click the down arrow on the sheet’s tab. From the menu that opens, select “Delete.” (You can also select “Rename” from this menu to give the sheet a name.)
 IDG
IDGUse the tab menu to rename, duplicate, move, protect, or delete a sheet.
[Also read: Windows 10 cheat sheet …]
Get suggestions for a spreadsheet with the Explore tool
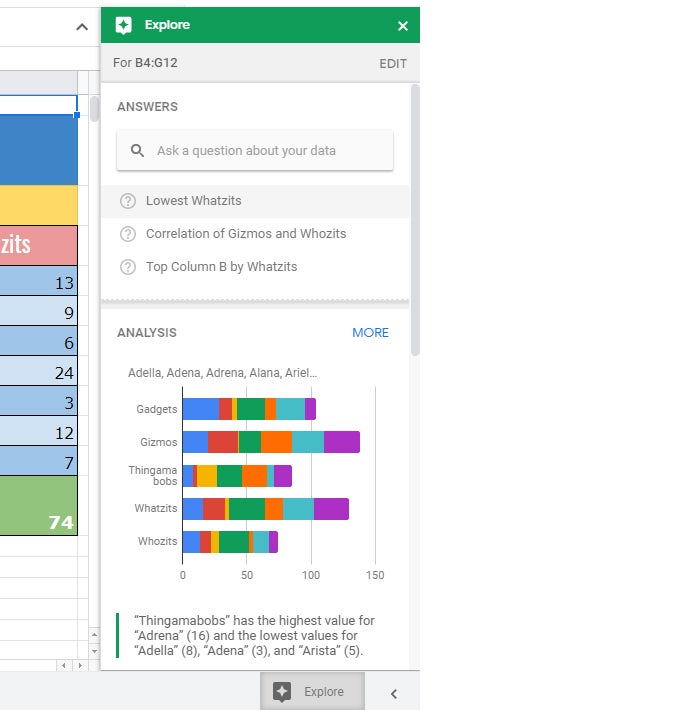
In the lower-right corner of your screen is the Explore icon. Click it and a panel opens: Explore analyzes your spreadsheet and helps you calculate answers to questions that you type in using natural English.
 IDG
IDGThe Explore feature helps answer questions about your data and suggests relevant charts, formulas or pivot tables.
For example, say you have a spreadsheet that lists sales figures (denoted as “price” on your spreadsheet) made by a specific person (“Mary”). When you type “What’s the sum of price by Mary?” Explore should show you the total in sales that Mary made.
By default, Explore will provide analysis and suggestions for the whole spreadsheet; you can adjust that by clicking the Edit link in the upper right of the Explore sidebar. Alternatively, you can select a range of cells before clicking the Explore button.
Explore may show you a variety of charts that illustrate the data in these cells. Note that Explore may not always present you with charts. Generally speaking, this depends on how the data within a range of cells you’ve selected relate to row and column headings (e.g., the names of salespeople and the items they’ve been selling, respectively). Explore may also present formulas and pivot tables that it suggests specifically for your spreadsheet.
You can drag a chart or formula from the Explore panel and onto your spreadsheet, or insert a pivot table into your spreadsheet by hovering over it and clicking the Insert Pivot Table button, then Create.
For more information, refer to the official Google help page for Explore: “Ask about your data & get suggested content.”
Recover older versions of a spreadsheet
When you have a spreadsheet open, you can look at older versions of it that were saved automatically by Google Sheets and revert the spreadsheet to one of those earlier versions. This can be useful for repairing editing mistakes made by you or others on a shared file.
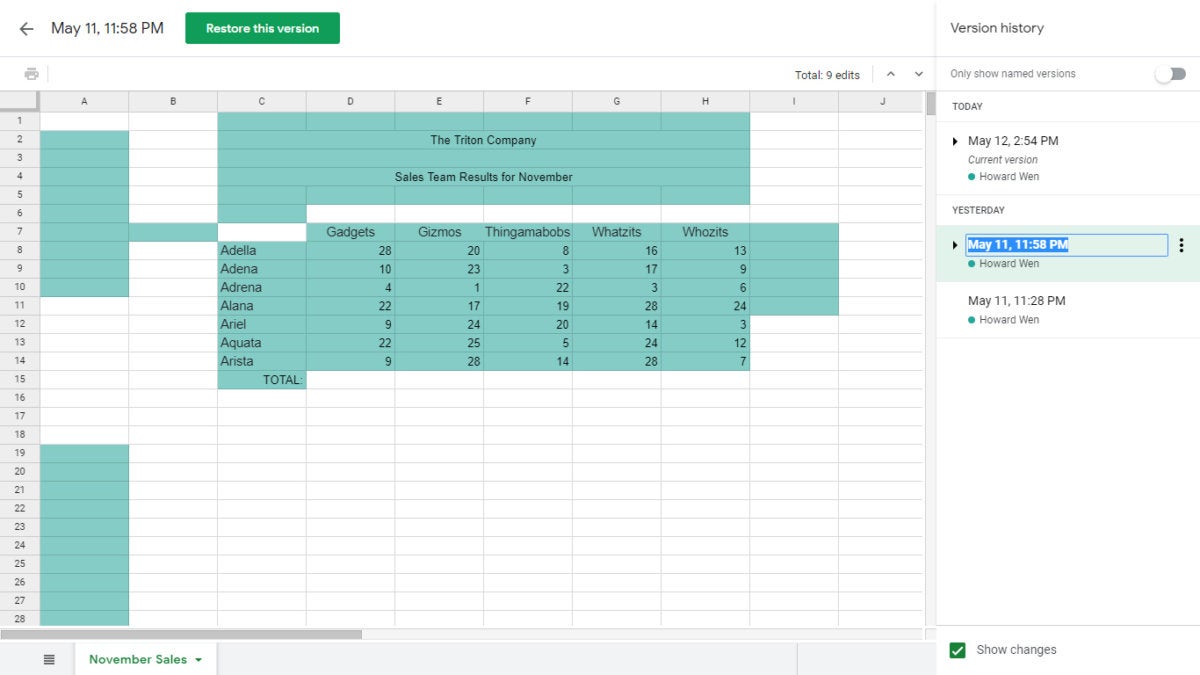
Click File > Version history > See version history. This opens a panel on the right that shows a list of older versions of the spreadsheet, organized by date and time.
IDG
Viewing an earlier version of a spreadsheet with Version history. (Click image to enlarge it.)
To give an older version a unique name, click on its date. You’ll be prompted to type in words to replace the date. The date and time will then appear in smaller type underneath the new name.
To see what an earlier version of the spreadsheet looks like, click its date or version name in the list on the right. That version of the spreadsheet appears in the main window.
To restore that version so it replaces the current one, click the green “Restore this version” button at the upper-left of the screen. The restored version appears at the top of the version history list, and the version you were looking at prior to restoring the earlier one becomes the second item in the list.
Share a spreadsheet for collaboration
It’s easy to share Sheets files with others and collaborate on them online. From the Sheets screen where you’re editing your spreadsheet, click the green Share button at the upper-right. A “Share with others” screen appears over the spreadsheet.
 IDG
IDGClick the Share button to share a spreadsheet in Sheets.
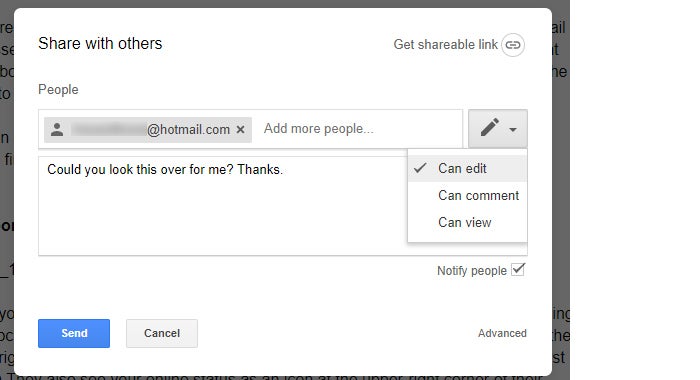
To share the spreadsheet privately: In the entry box, enter the email addresses (or names of your Google Contacts) of the people with whom you want to share. By default, people you invite to the spreadsheet can both edit it and share it with others.
To set it so that people you invite can add comments to your spreadsheet but not edit it, click the pencil icon to the right of the box and choose “Can comment.” Or, to allow them to view your spreadsheet but not edit it or add comments, click the pencil icon and choose “Can view.”
 IDG
IDGSetting permissions for a file being shared privately.
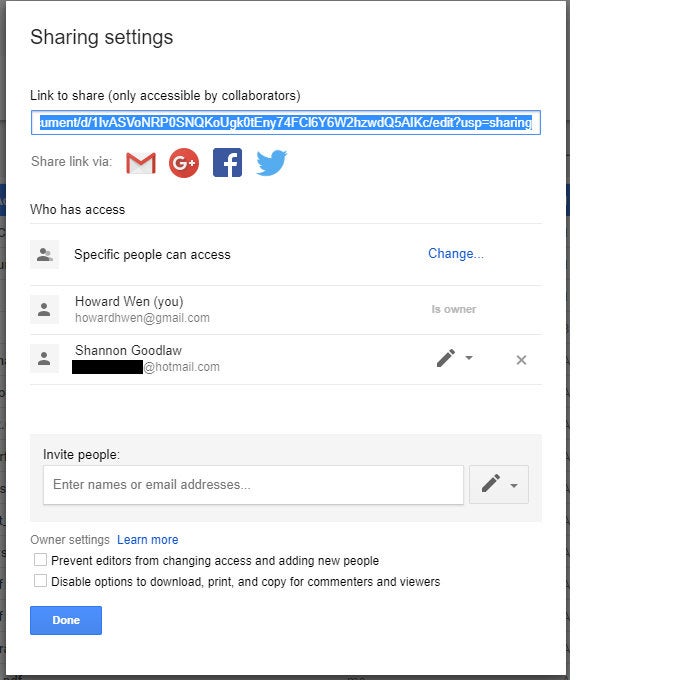
To prevent collaborators from sharing the spreadsheet with others, click “Advanced” at the bottom of the “Share with others” panel. This expands the panel, revealing all the settings for sharing your spreadsheet. Check the box marked “Prevent editors from changing access and adding new people.” (The checkbox below it lets you prevent those with comment and view permissions from downloading, printing, or copying the spreadsheet.)
 IDG
IDGThe Sharing settings screen lets you change collaborators’ permissions, prevent additional sharing, and disallow downloading, printing, and copying.
G Suite and Drive Enterprise subscribers can also set an expiration date for a shared spreadsheet from this same screen. When you hover your cursor over a collaborator’s name, a stopwatch icon appears. Click it, then click the drop-down next to “Access expires” to set the person’s access to expire in 7 days, 30 days, or on a date you select. Expiration dates cannot be set for collaborators with edit access, only comment or view access.
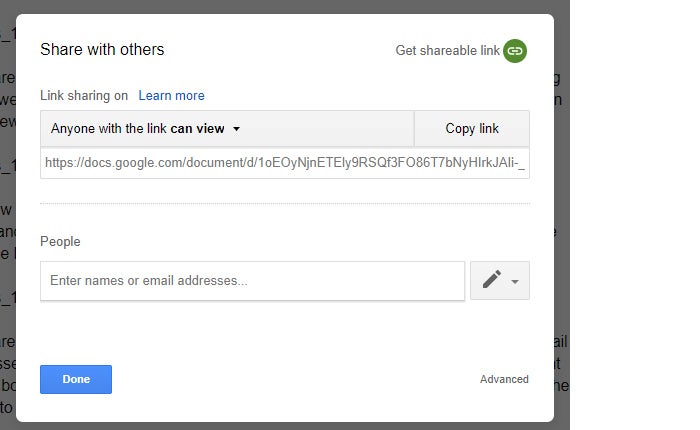
To share the spreadsheet publicly: On the “Share with others” screen, click the chain icon by “Get shareable link.” A panel opens, showing you a web link that you can share with other people (and that they can share with others). Anyone who has the link can access your spreadsheet, so think carefully before choosing this option. For business purposes, it’s probably better to invite specific people privately.
 IDG
IDGGetting a public sharing link for a document.
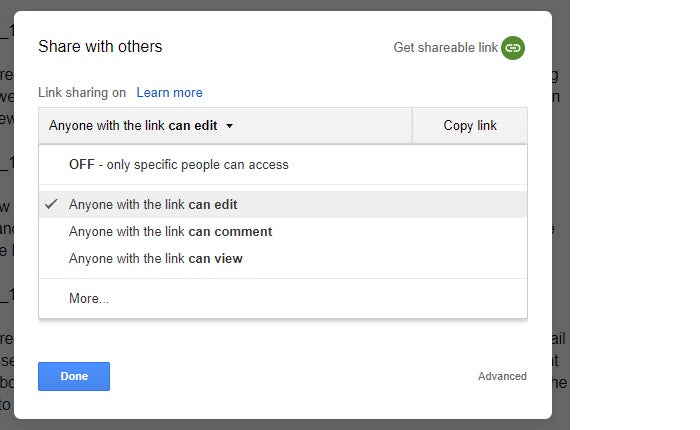
By default, anyone with the sharing link can only view your spreadsheet. To allow anyone to comment on or edit your spreadsheet, click “Anyone with the link can view” and select “Anyone with the link can edit” or “Anyone with the link can comment” from the drop-down menu. To turn the sharing link off, select “OFF — only specific people can access” from the same drop-down menu.
 IDG
IDGClick the drop-down to change access permissions or remove the shareable link.
Remember, if you turn on the public sharing link to your spreadsheet and set it so that the public can edit it, then anyone with access to that link can change your spreadsheet!
You can use both public and private sharing options for the same spreadsheet — for instance, you could allow the public to view your spreadsheet but let only specific people edit or comment on it.
Any spreadsheet you’ve shared (or that others have shared with you) will have an icon of two silhouetted heads next to it in the spreadsheet list on your Google Sheets home page.
 IDG
IDGShared spreadsheets display a “shared” icon in the file listings.
You can also share a spreadsheet from Google Drive, including from a Team Drive, without having to open it first in Google Sheets. See “How to share a document for collaboration” (for sharing from My Drive) and “How to share documents in Team Drives” (for sharing from Team Drives) in our quick guide to using Google Drive for collaboration.
Collaborate on a spreadsheet
The people you’ve shared a spreadsheet with can view, comment on, or edit it (depending on the permissions you’ve granted them) at the same time as you, or at any time that’s convenient.
In Google Docs, having collaborators work right in the body of the document makes sense; it allows them to, for example, rewrite sentences or whole paragraphs. Having multiple people making changes in a spreadsheet, however, can get confusing pretty quickly. In most cases, we’ve found that commenting is the optimal form of collaboration in Sheets. People can attach comments to specific cells so you know precisely what they’re talking about, but their comments don’t interfere with the spreadsheet formatting or data.
To add a comment to a spreadsheet: Select a cell and click the “Insert comment” icon on the toolbar at the top of the spreadsheet.
 IDG
IDGClick the “Insert comment” icon to, well, insert a comment.
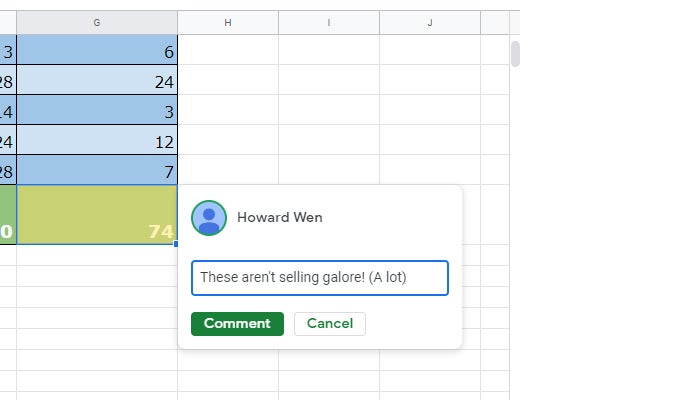
A dialog box opens by the cursor. It has your name across the top and an entry line where you can type in a brief comment about the selected cell. When you’re done typing, click the Comment button.
 IDG
IDGTyping a new comment.
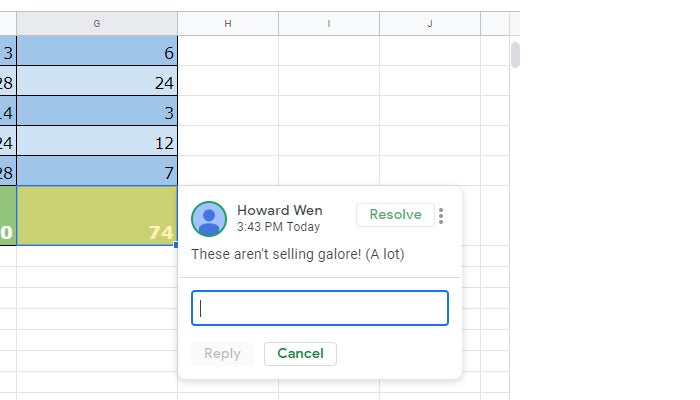
Any cell with a comment (from you or a collaborator) is marked by a triangle at its upper-right corner. To see the comment, move the mouse pointer over the cell; a card with the commenter’s name and comment appears by the cell. Clicking this card expands it to reveal an entry line (“Reply…”) where you can add more comments to it.
 IDG
IDGResponding to a comment.
Clicking the Resolve button closes the card and removes it from the spreadsheet.
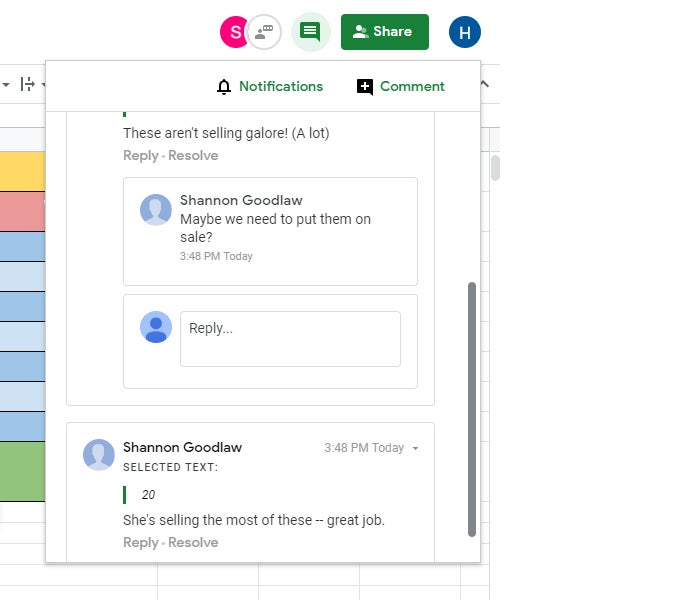
To see a listing of all the comments in the spreadsheet, including ones that have been marked resolved, click the “Open comment history” icon to the left of the green Share button located at the upper-right of the page. This listing helps you go through all the comments that have been added to your spreadsheet without having to hunt for them on the spreadsheet itself. Clicking a comment in this listing jumps the view of your spreadsheet to the cell where the comment is located and opens that comment card.
 IDG
IDGThe comments pane lets you quickly review all comments and jump to specific ones.
For more details about collaborating on your spreadsheet, including what it’s like to collaborate in real time, see “How to collaborate on a document” in our Google Drive guide.
Download and export a spreadsheet
[Also read: Mattermost makes case for open source as team messaging market booms]
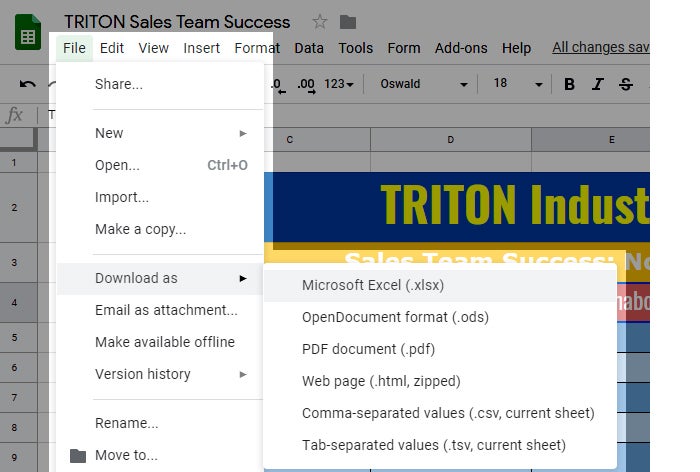
Your spreadsheets will remain stored in Google Drive for as long as you want them to, but there are times when you’ll want to download them for use offline. When you download a spreadsheet, you can choose to convert it to Excel (.xlsx) format or one of five other formats, such as .csv or PDF.
On the top menu, select File > Download as and choose a file format. The spreadsheet will be saved to your PC’s hard drive in that format.
 IDG
IDGDownloading and converting a spreadsheet to Microsoft Excel format.
The Google Sheets mobile app for Android and iOS
With the exception of the Version history tool, the Google Sheets mobile app for Android and iOS (in iPhone and iPad versions) has many of the same features described in this guide, including the Explore tool. You can even share spreadsheets and work on them with other people through the mobile app. (See “How to share from the Google Drive, Docs, Sheets and Slides mobile apps” in our Google Drive guide.)
The Sheets mobile app can be handy for making quick edits on the go or following up on your collaborators’ comments. Any changes you make are automatically saved and will appear the next time you open the spreadsheet in the Google Sheets web app.
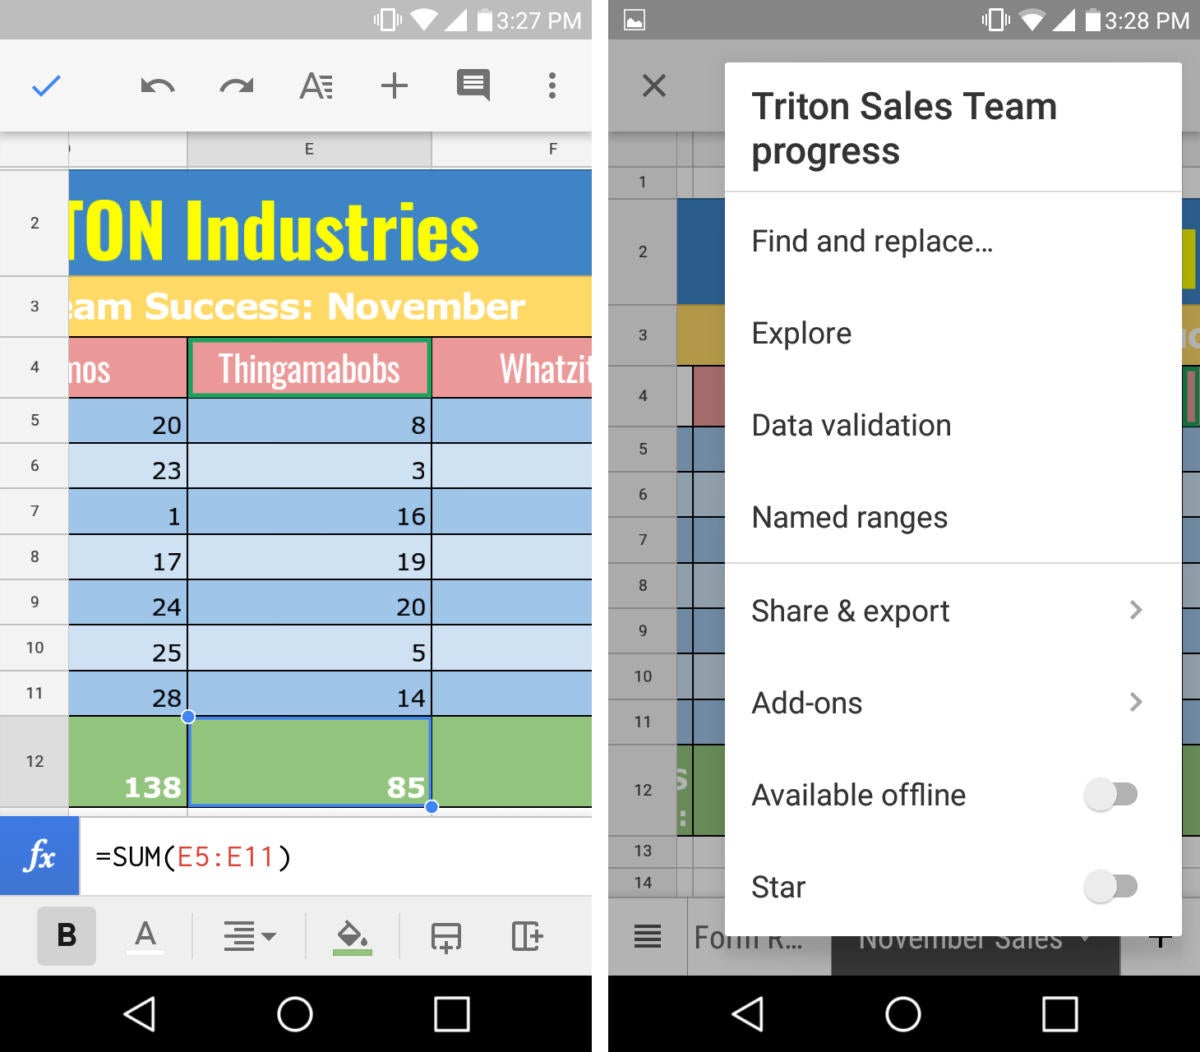
Toolbars along the top and bottom of the screen let you take actions such as adding comments and new sheets to your spreadsheet. Click the three-dot icon at the far right of the top toolbar to use the Explore tool or to share your spreadsheet with others. Tapping a cell brings up new top and bottom toolbars. The functions on these toolbars let you add columns or rows next to the cell, or edit the formula or text inside it.
IDG
The Google Sheets Android app. (Click image to enlarge it.)
Use keyboard shortcuts
[Also read: Office 365 vs. G Suite: Which has better management tools?]
You can save a lot of time in Google Sheets by using keyboard shortcuts for common tasks. We’ve listed a handful of the most useful shortcuts below. (Mac users, substitute the “Cmd” or ⌘ key for “Ctrl” and the “Option” key for “Alt” unless a separate Mac shortcut is noted.)
Handy Google Sheets shortcuts
You can discover even more shortcuts by selecting Help > Keyboard shortcuts from the top menu when you have a spreadsheet open in Google Sheets.
Credit: Howard Wen, Computerworld.


1 comment