Quick Base is a powerful low-code tool that lets business users create their own applications. These seven tricks will illuminate some of the paths to building successful enterprise apps and workflows.
The low-code/no-code development platform Quick Base lets so-called citizen developers create applications and workflows for their teams and departments without needing the intervention of IT. Based on the structure of a database, as its name implies, the platform relies on fields, records, and reports to create, link, and manipulate sets of data.
Teams can assign tasks and manage projects and can set actions to be triggered when certain conditions are met, such as automatically sending notifications when a field gets changed or a value hits a certain threshold. Businesses can also prepare custom communications for vendors and clients based on relevant data, such as invoices or estimates based on the details of a project. And they can do all of this with relatively little coding.
Despite that, Quick Base is a complex product with a lot of capabilities, usually offering several ways to accomplish a specific task. It does have a fairly extensive online help center and user forum to turn to. But to get the most out of it, it helps to learn a few tips from other users.
We asked three experienced Quick Base users to share their favorites. The following tricks are offered by Sharon Faust, founder of online learning center Quick Base Junkie; Ian Greig, Group Technical and IT Manager at Run Energy, a provider of operations and technical services to the energy and environmental industries; and Mark Shnier, owner of application developer Your Quick Base Coach.
- Brand your apps to differentiate them
- Use HTML to make document templates
- Use Microsoft Word and the Rich Text format to generate HTML
- Add a graphic, like a logo, to your emails
- Change who an email comes from
Brand your apps to differentiate them
It’s easy to change the appearance of your apps from the default purple bar at the top. You could brand an app for sharing with clients or just tag it to keep track of it internally — to immediately identify an app you’re still testing, for example.
To spruce up an app’s appearance, chose Branding in the Settings and check the options to customize the app header and footer. Select Basic, and you can change the text at the top left and right of the bar, plus specify colors for the bar and the text. You can also add a link to an image or an external website.
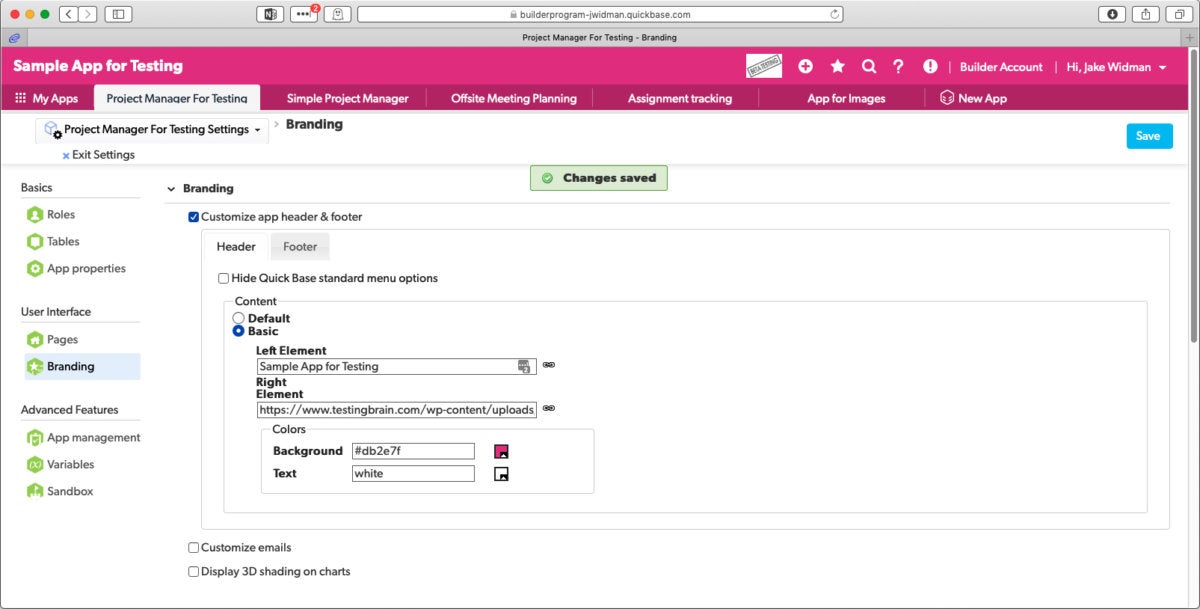
You can customize your app’s appearance by changing the words in the bar at the top, the background color, and the color of the text. You can also add a graphic on the right — to stamp an app as currently undergoing testing, for example. (Click image to enlarge it.)
You can change the footer by adding a graphic, too. But be warned: the graphic will come in at actual size, unlike in the header, where it will be sized to fit. If you want to do this, just prepare a properly sized version of the graphic for use in the footer.
Use HTML to make document templates
Companies often generate proposals, spec sheets, or other documents based on stored data. For internal consumption, it’s fine if they look like a standard table, but for distribution outside the company — to mail a proposal to a client, for example — it makes a better impression if they look more carefully designed. That doesn’t mean you have to bring the table into an external program to make it look good; you can use HTML to generate an attractive document.
One way to do this is to bring up Settings for the record you want to print and add a new field, specifying a Formula – Rich Text field.
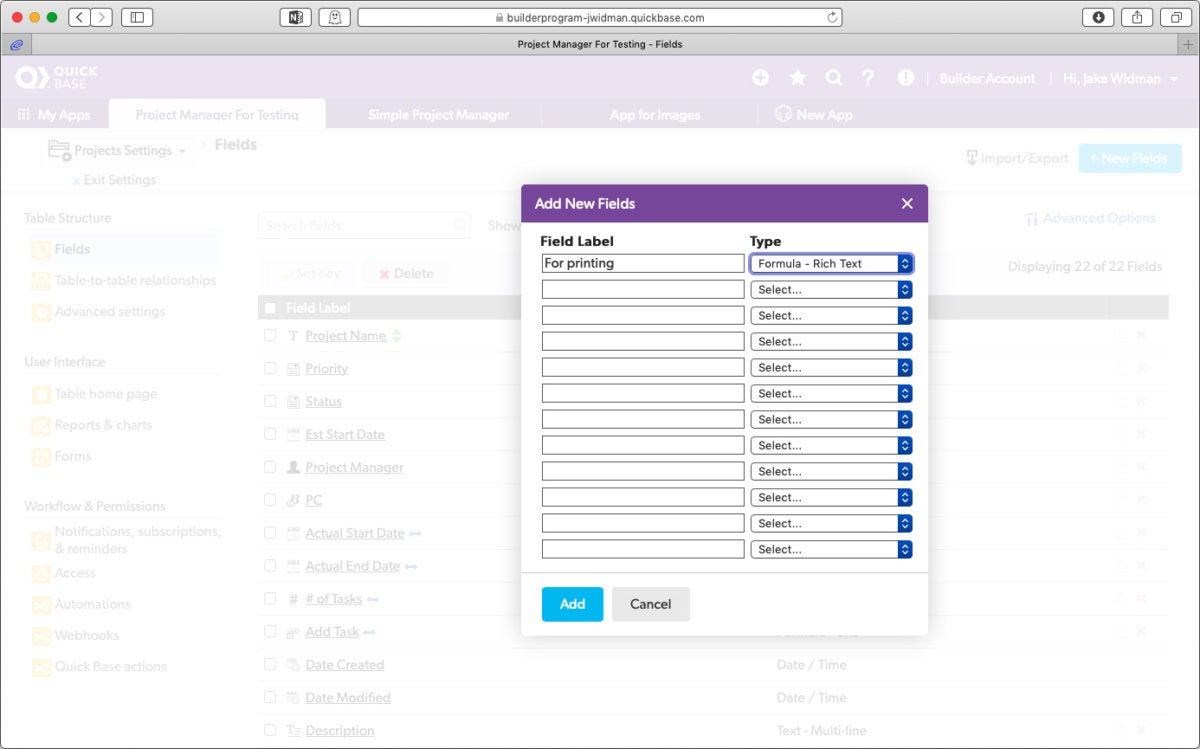
To format data pulled from Quick Base into a more attractive document for shing externally, you can use HTML. Start by adding a Rich Text field to your record. (Click image to enlarge it.)
In the “Formula – Rich Text field options” box, insert the fields you eventually want to print along with the HTML that styles them. (Not comfortable coding HTML? See the next tip.)
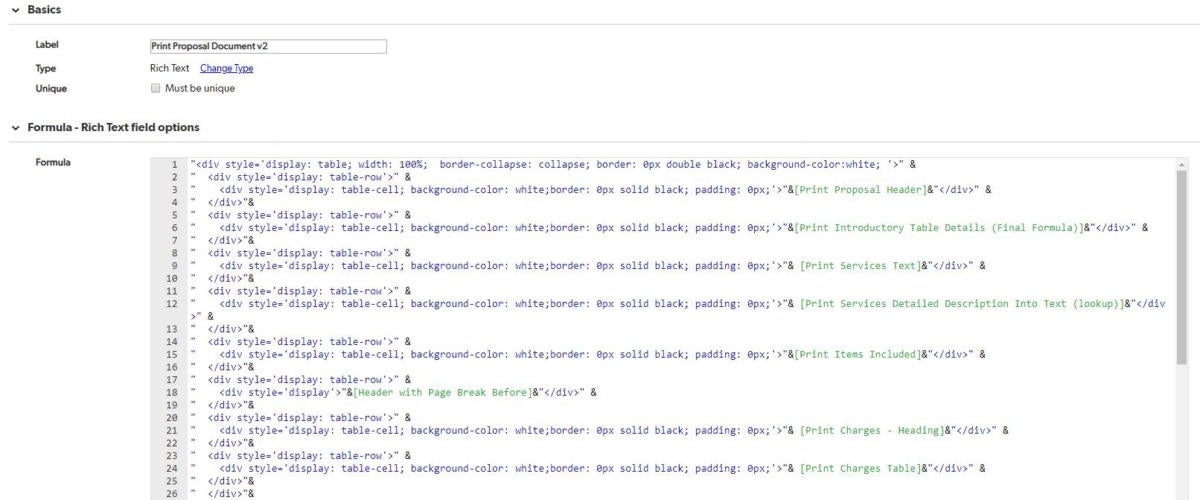
Add the fields you want to print to the “Formula – Rich Text field options” box along with your HTML. (Click image to enlarge it.)
Save that, and then create a new Form that contains just the field you just created. When you print that form, you’ll get the styling you want and the data you need. You can also print it as a PDF for emailing if you prefer.
If your data changes — in the illustrated scenario, for instance, when you want to generate a new proposal with different specs — the new data will automatically take on the formatting you’ve already set up.
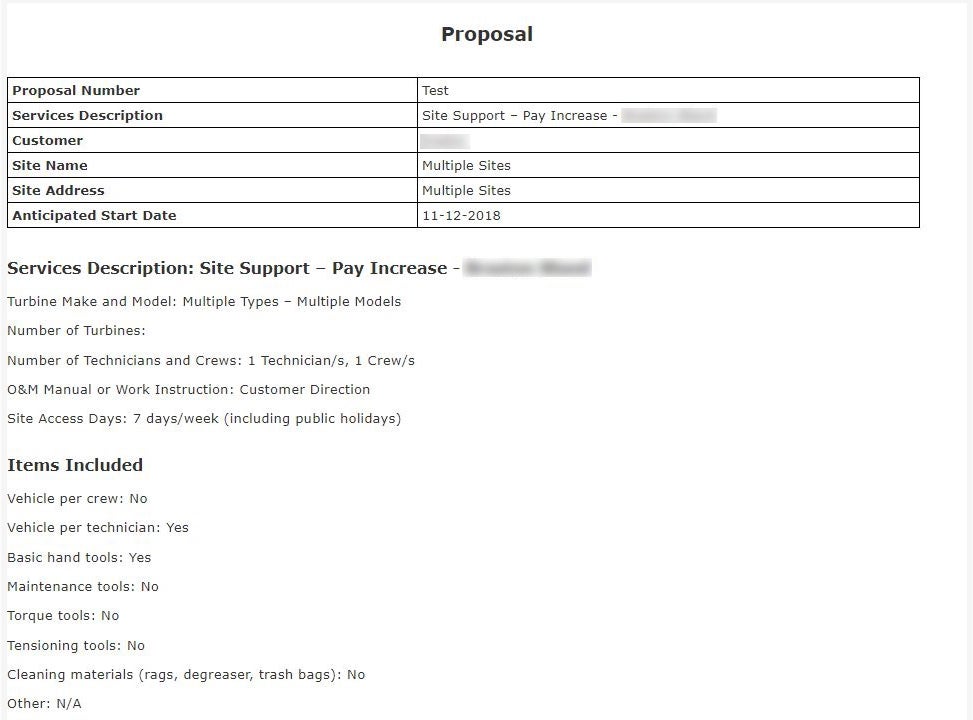
The result is a well-designed proposal. (Click image to enlarge it.)
Use Microsoft Word and the Rich Text format to generate HTML
Quick Base can also automatically generate emails, and you can use HTML to format those as well. You can hand-code the HTML if you’re comfortable with that, but there’s an easier way: start with a Microsoft Word document. Design the document the way you want it in Word, with your field names in square brackets, and add all the text formatting that you want.
Click Settings in your application and create a new page, setting Rich Text Page as the type. Name the page, and copy and paste your Word document into the space provided. When you click the HTML button in the formatting toolbar, you’ll see that the code for your formatting is already in place.
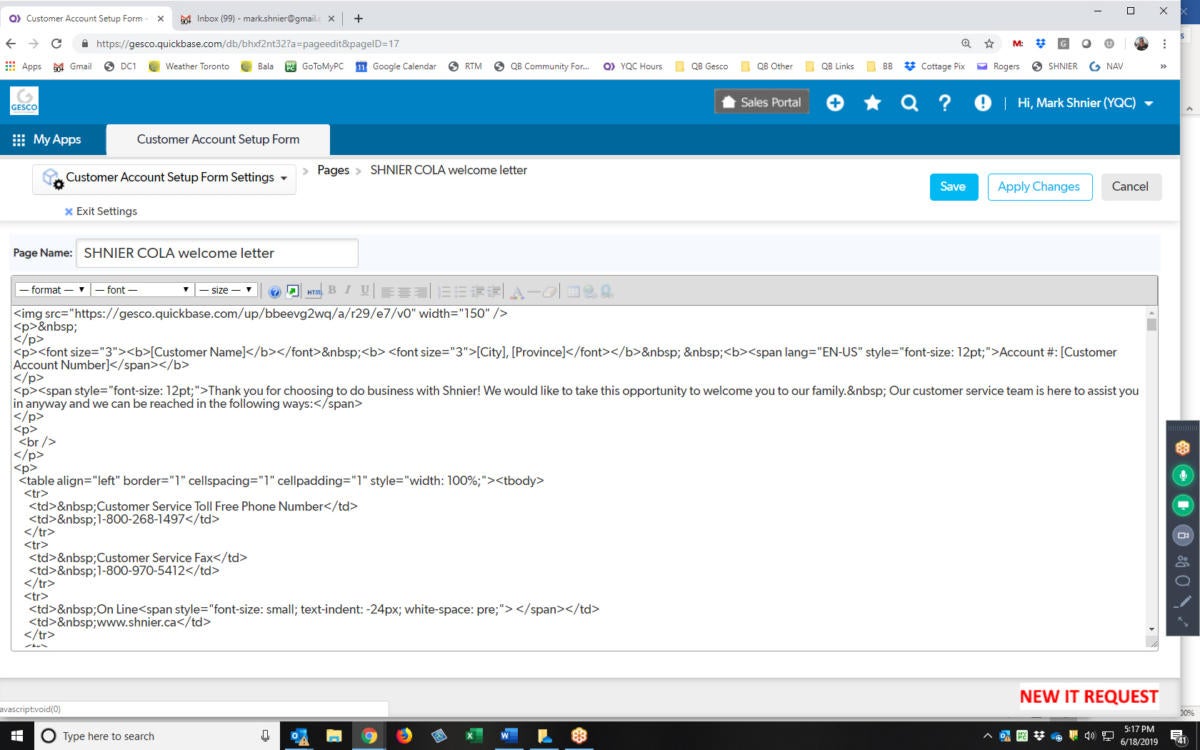
You can paste a Word document into a Rich Text page and then click the HTML button as a quick way to get the HTML code for the text formatting. (Click image to enlarge it.)
You can copy and paste that code into a custom email that you send from Quick Base. In your app’s Settings, click Notifications, Subscriptions, & Reminders, add a new email, and set Message Type to Custom Message.
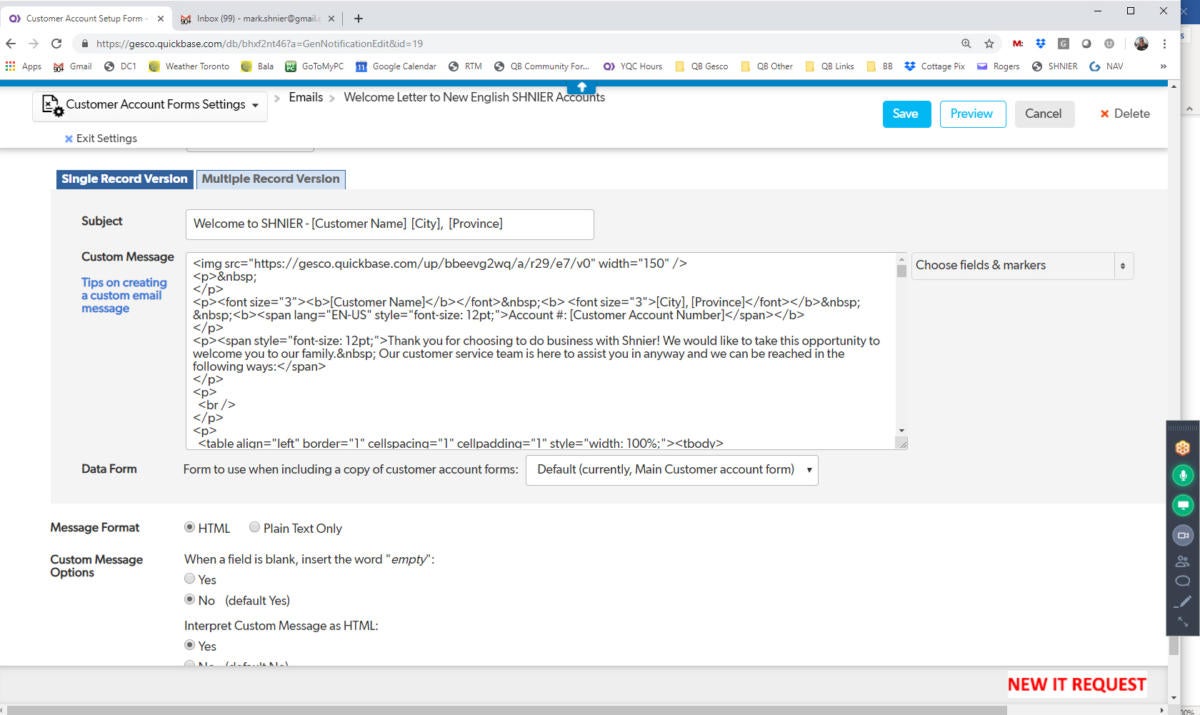
Copy and paste your HTML code into a custom email message. (Click image to enlarge it.)
Now the automatic email will pick up the content as well as the formatting that makes it look good.
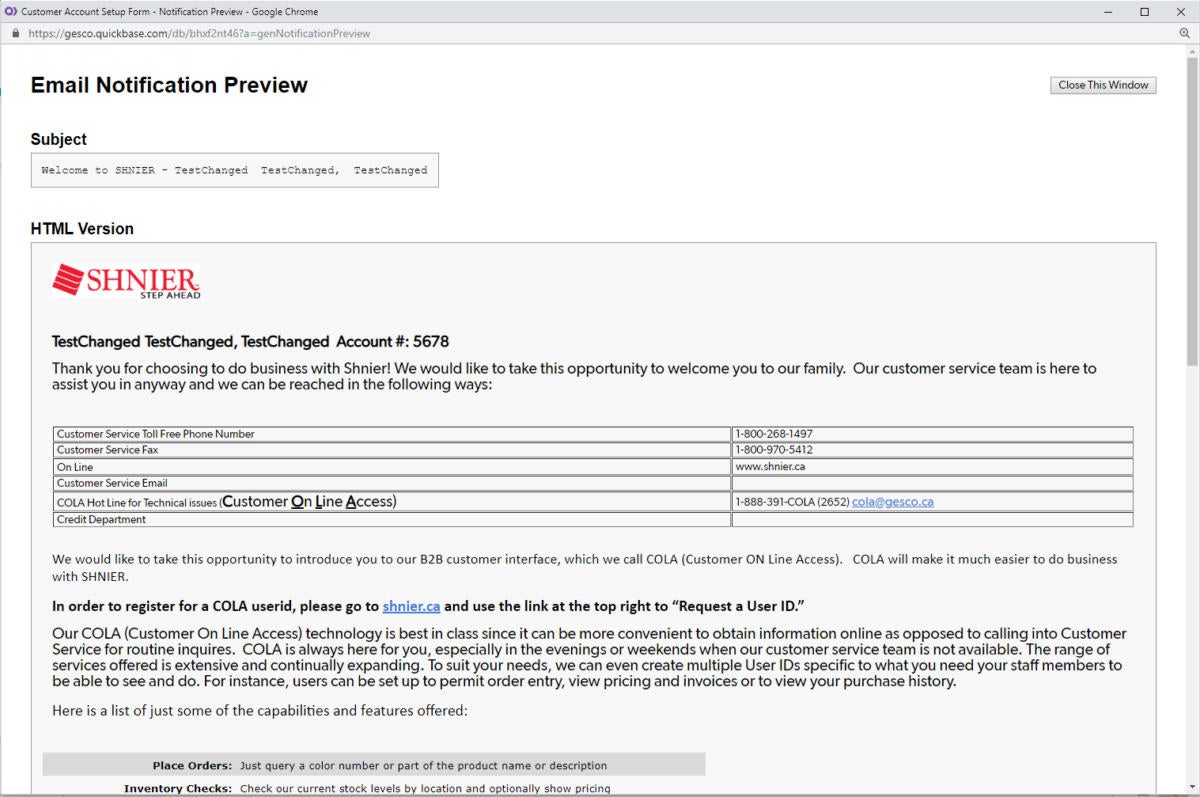
The result: a nice-looking email notification. (Click image to enlarge it.)
Add a graphic, like a logo, to your emails
Quick Base itself comes with more than 500 icons in different sizes that you can add to your app to dress it up. But you’re not limited to those — you can easily customize generated emails with your company logo by including a link to the image in your email template.
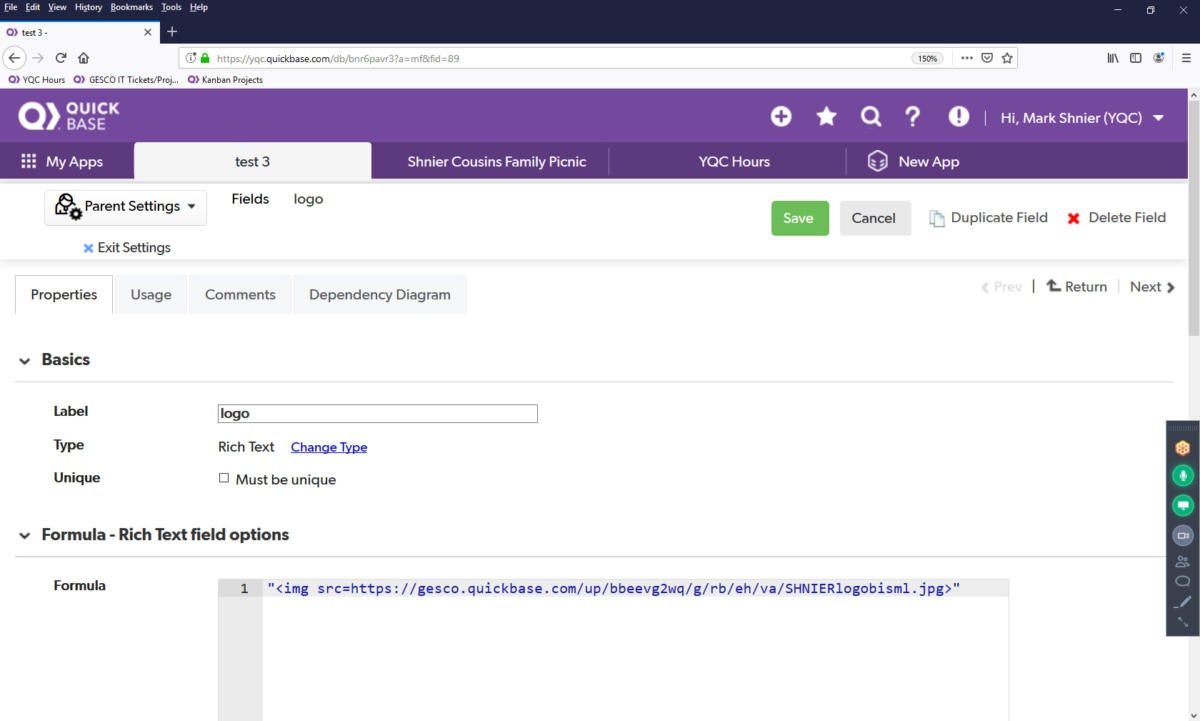
It’s easy to add your logo or other custom graphics to email notifications by including a link to the app they’re stored in. (Click image to enlarge it.)
However, you have to make sure the recipient has the privileges to access the image, or they won’t see it. If you store logos in an app and the recipient doesn’t have permissions for that app, the logo won’t render for them.
The easiest approach is to set up a new app to hold your logos and other public-facing graphics and import them all into it. Then give access to the app to the built-in user group called Everyone On The Internet. (Your account administrator has to enable this functionality.) You can define the group’s permissions just like any other group — only view, only access certain tables, whatever. The point is that all the logos imported into that app will always be available to, well, everyone on the internet, and you don’t have to worry about whether someone will be able to see your logo.
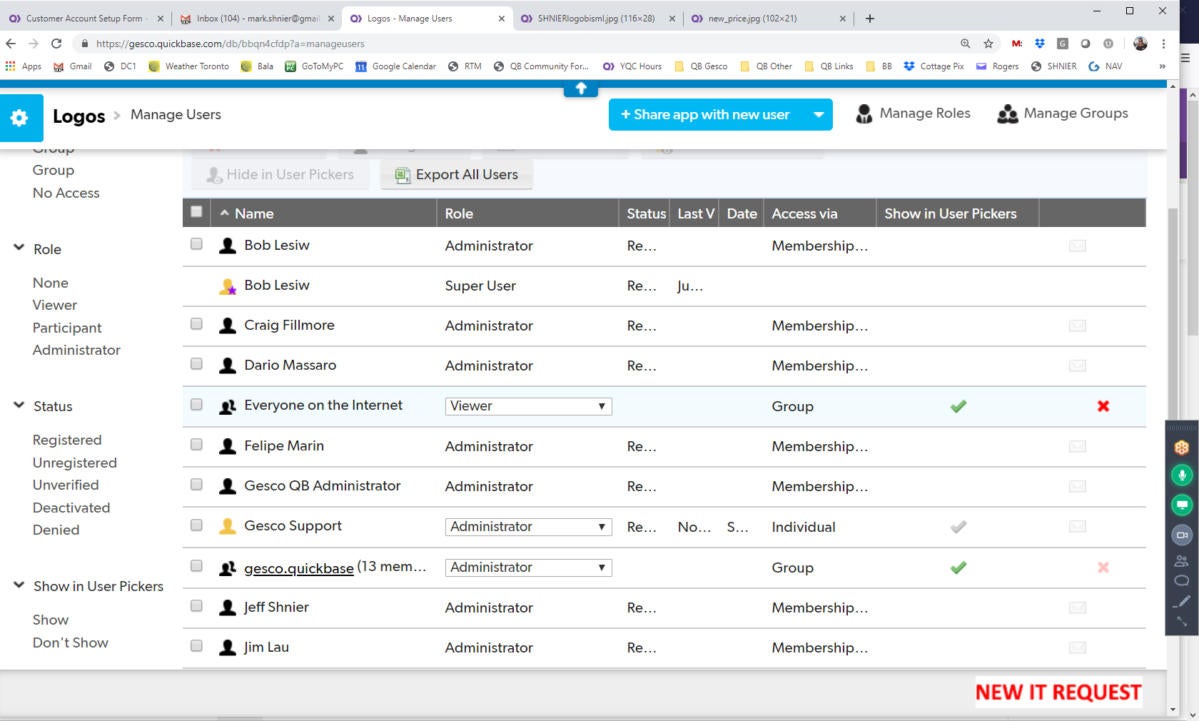
The trick is to create a single app to hold all your public graphics and grant access permissions to the built-in Everyone On The Internet user group. (Click image to enlarge it.)
Change who an email comes from
When you set up an email in Quick Base, you can specify any field with an email address as the recipient. For example, if you’re sending a collection notice, you would pull the address from the customer record. But who are they going to reply to? The default sender for a Quick Base-generated email is notifyquickbase.com, but that’s a dead end — there’s nobody monitoring that address.
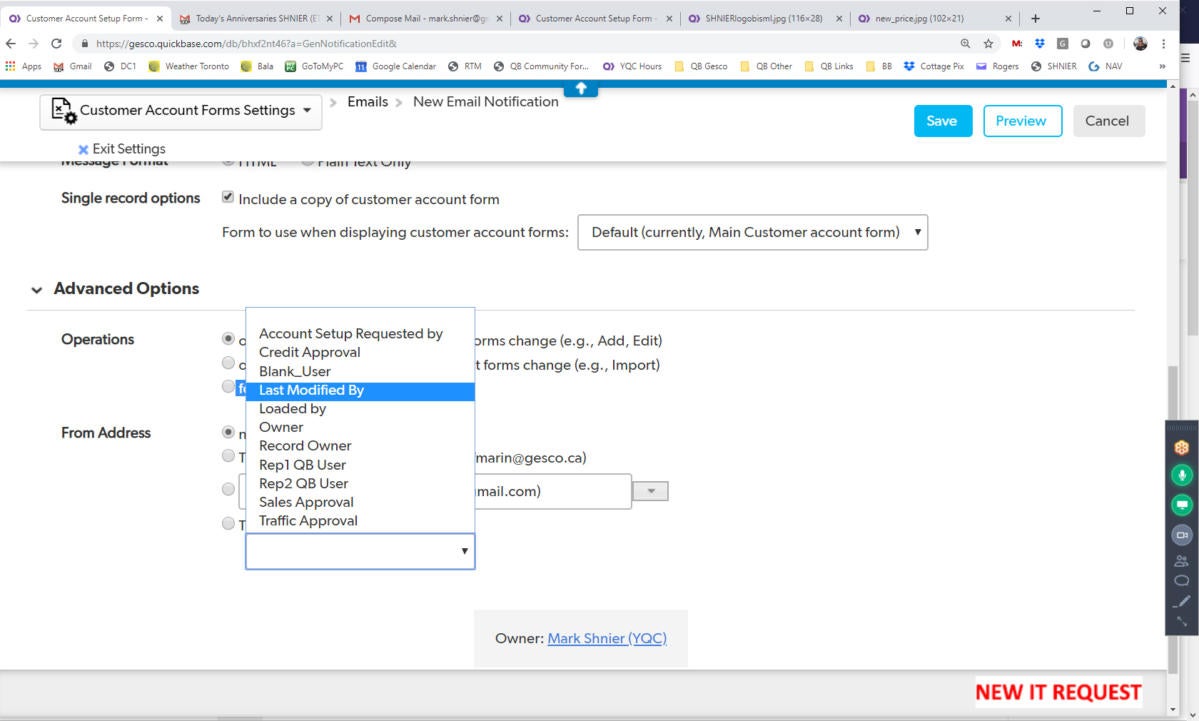
Instead, you can also specify a field name for the From address. For a collection letter, it might come from the account manager. Or it could come from the person who last modified the record — who did whatever triggered he email — or any email address the customer service department actually monitors.
Your Quick Base Coach
To make sure recipients can reply to automatically generated emails, you can set the From address in your template to be an appropriate field, such as the person who last touched the customer record. (Click image to enlarge it.)
Consolidate multiple data sources
Sometimes you want to bring data from multiple applications into a single table — so that you can easily review activity in multiple locations, for example. Quick Base makes this easy, because while it generates record IDs automatically (as other databases do), it also lets you set any field with a unique value as the merge key field for that record. You then use the Import From Table feature to bring the desired records into a new table.
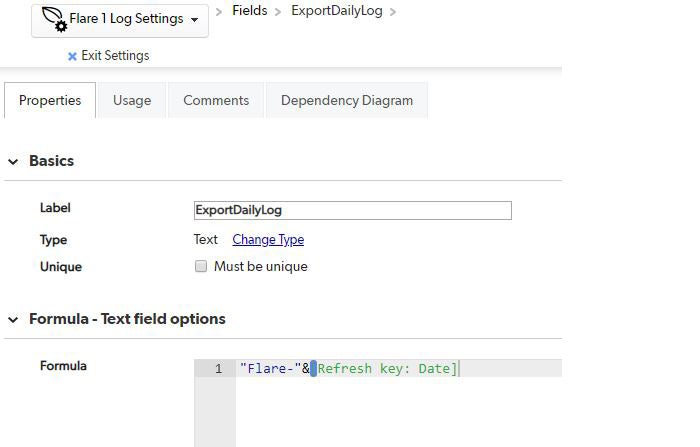
You start by creating and naming a field in each source table and using a simple formula to generate unique data for that field — date and time, for example, or data source and location.
 Ian Greig
Run Energy monitors the landfill gas (LFG) output from several sites and brings a daily reading from multiple sites into a single table for a quick overview. Shown here: A simple formula establishes a unique field in each source table.
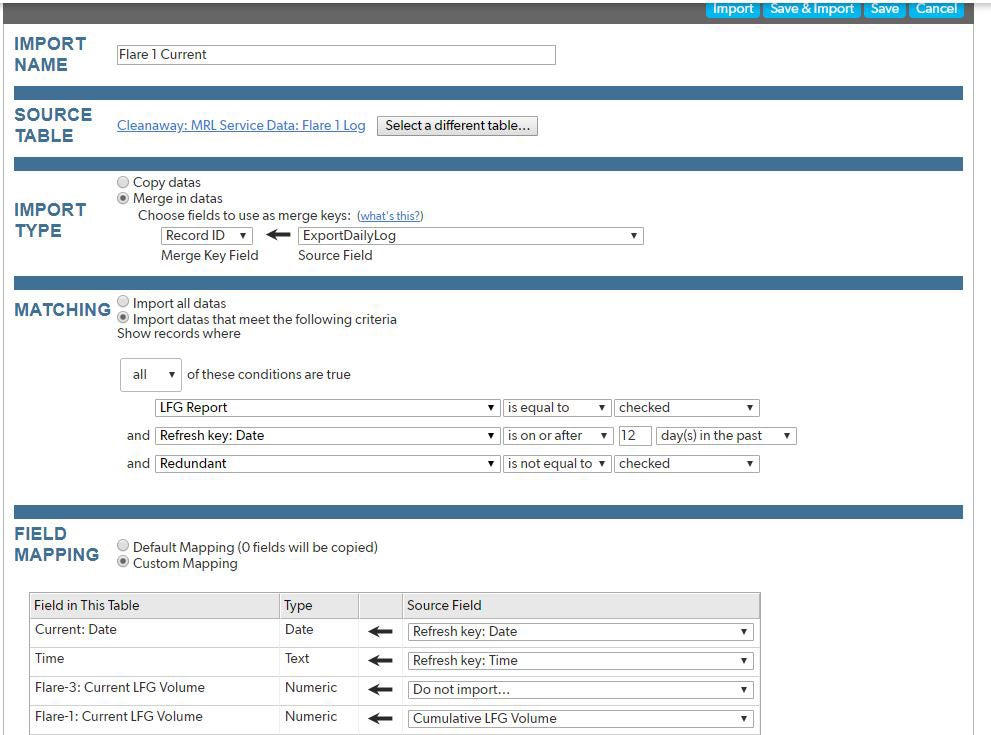
You then set up the table you want to import the data into, select Import/Export from the More menu, specify the merge key field (and check Must Be Unique), and map the fields you want from the source tables to fields in the destination table.
Ian Greig
The source data is used as a key field to import the desired record into the consolidated table. (Click image to enlarge it.)
Finally, you run the import to create or populate the destination table.
 Ian Greig
The result is a table showing the flow data at multiple locations.
You can also set this up to happen automatically using Quick Base’s CSV Sync feature. CSV Sync can connect to cloud storage options such as Box or Google Drive and run your import command on CSV files exported from your source tables.
Use Webhooks to send messages to Slack channels
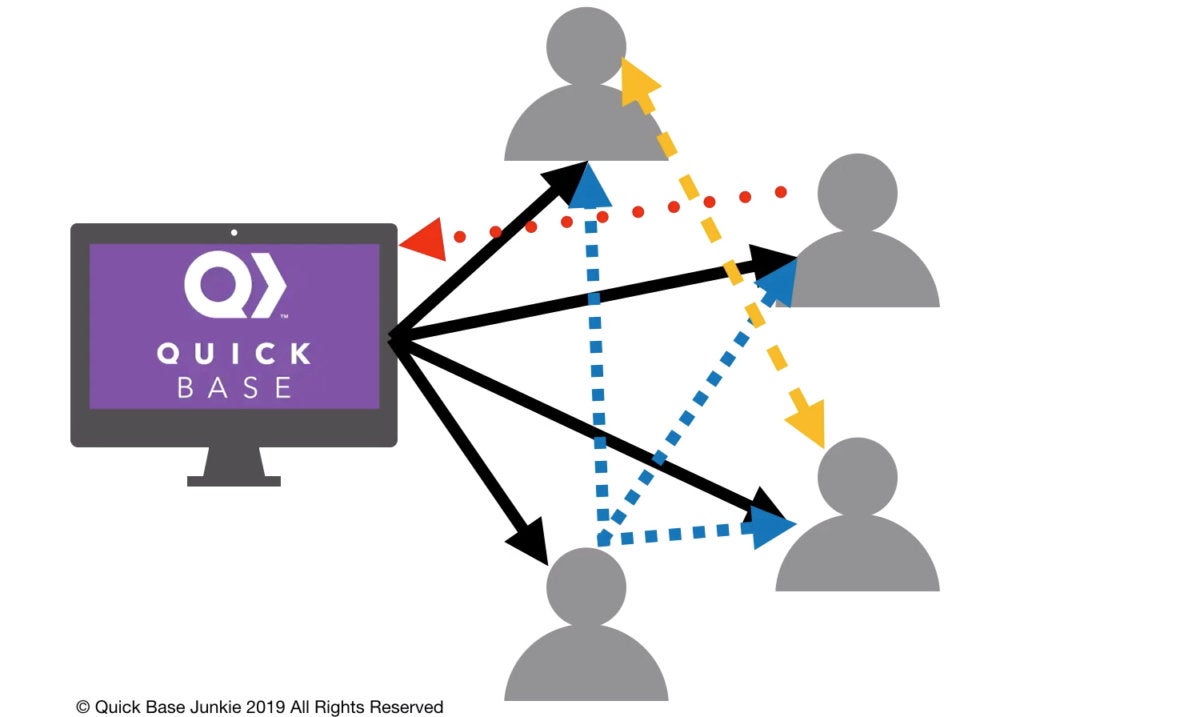
You can use Quick Base to automatically generate email notifications to others in your group whenever a record is changed, added, or deleted. But those notifications come as individual email messages to each member, and there’s no way to reply to everyone. That can lead to a lot of one-on-one sub-conversations that don’t benefit the entire group.
QuickBaseJunkie.com
Email notifications to a group can lead to fragmented communications as recipients reply to each other or try to reply to the message itself. (Click image to enlarge it.)
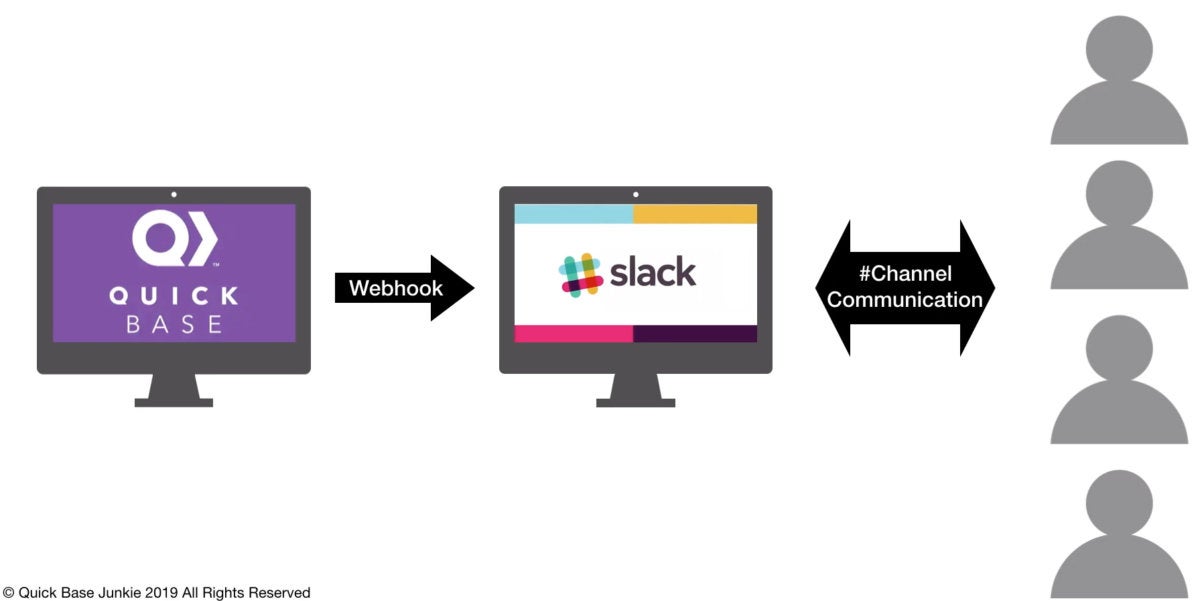
To encourage more effective interaction, you can send the messages to a Slack channel that everyone belongs to.
To do that, first you enable incoming Webhooks in Slack, as detailed by this Slack support page. That will give you an https address to use as the destination for your messages. Formatting and structuring the messages themselves requires using JavaScript Object Notation (JSON) to describe the message and its formatting, as well as some familiarity with Quick Base’s own Webhook functionality. But once done, you can transfer your team communications from email chains to Slack channels, where they belong.
QuickBaseJunkie.com
It works better to send messages to a central Slack channel where everyone can see the notifications and responses in one place. (Click image to enlarge it.)
Credit: Jake Widman, Computerworld

