Sharing Google Docs, Sheets, and Slides files makes it easy to collaborate with colleagues on documents, presentations, and spreadsheets. Here’s how.
You may think of Google Drive mostly as a cloud storage service, but it also includes a suite of online office apps: Google Docs (word processor), Google Sheets (spreadsheet app), and Google Slides (presentation app). You can use them to collaborate with colleagues on a document, spreadsheet, or presentation in real time or asynchronously. These apps can also be used to import, export, and natively edit Microsoft Excel, PowerPoint and Word documents.
With a Google account, you get free use of these apps and 15GB of free Google Drive storage. For more storage, start at $2 per month.
For business use, Google sells several tiers of Google Workspace plans that include more storage as well as enterprise collaboration, security, and administrative tools. These plans start at $6 per user per month. There’s also a Google Workspace Essentials plan for organizations that don’t need hosted email.
Google Drive, Docs, Sheets, and Slides work the same among these free and paid plans, but with a few extra features added to the Workspace ones. Unless otherwise noted, this guide covers sharing and collaborating with your documents under a free, personal Google account. Most steps are the same with a Google Workspace account, but note that your administrator may have disabled or limited some capabilities.The best ways to manage multicloud collaboration apps
Most of this article covers sharing and collaborating via My Drive, the drive controlled by individual users whether they use Google Drive through a personal Google account or a Workspace account. A section at the end covers shared drives, which are available only through Google Workspace accounts.Table of Contents
How to share your document
There are a few different ways to start sharing a file in Google Drive and its related apps:
- On the home screen of Google Drive (also known as My Drive), click to highlight the document, presentation, or spreadsheet that you want to share, then click the Share icon (a head silhouette) on the toolbar at the upper right. (For simplicity’s sake, we’ll say “document” from now on to refer to spreadsheets and presentations as well.)
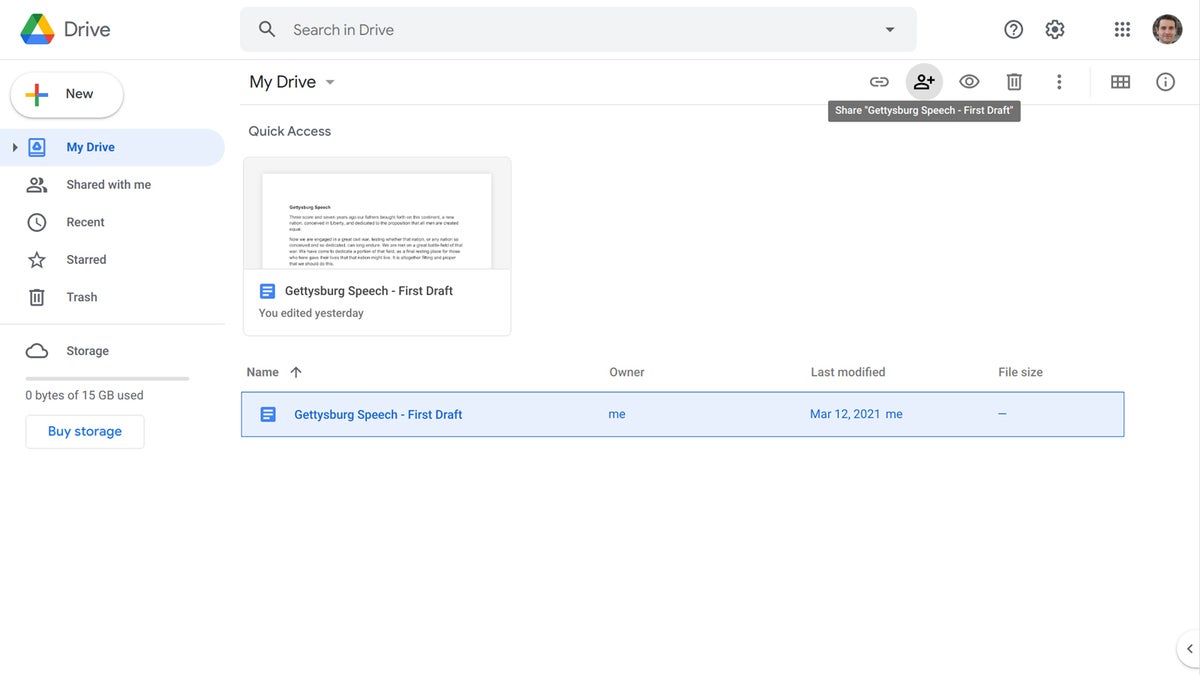
- On your My Drive page, right-click the document that you want to share and select Share from the menu that appears.
- To share a document that you’ve opened in Docs, Sheets, or Slides, click the big Share button in the upper-right corner.
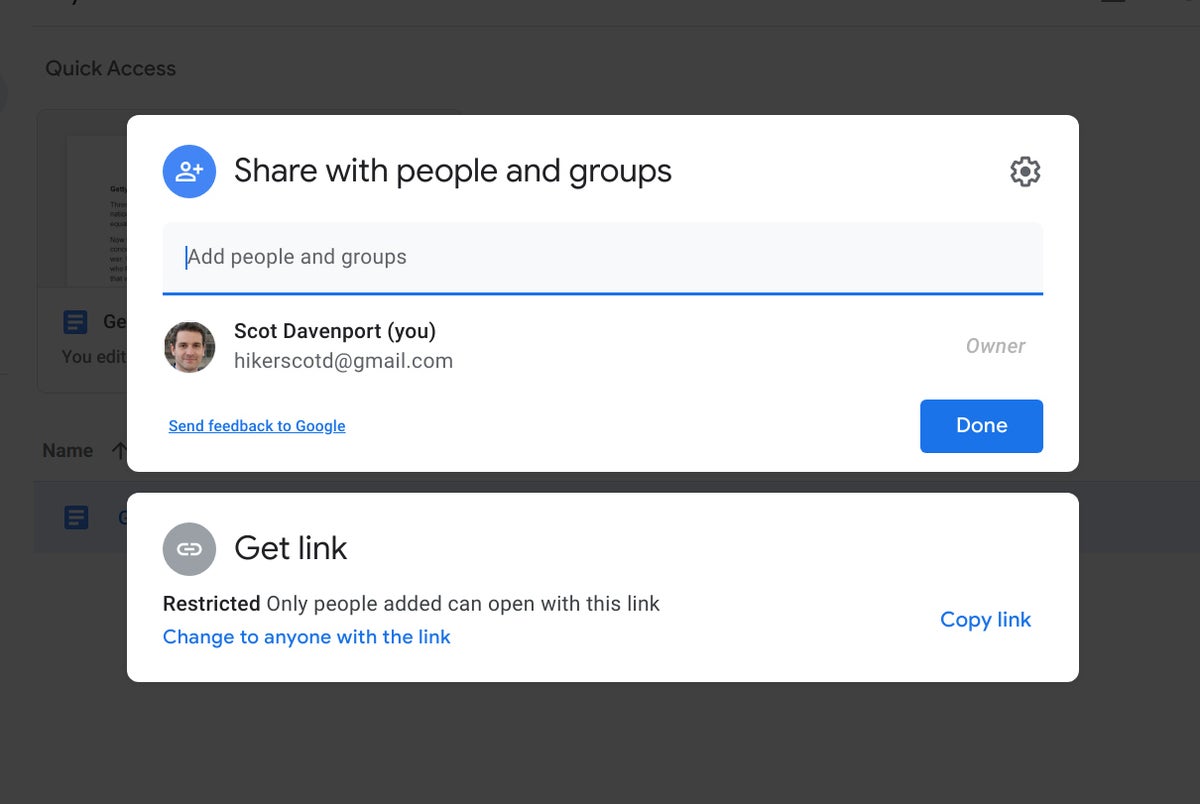
Any of the actions above opens the “Share with people and groups” pane, which gives you fine-tuned control over who can see your document and what they can do with it.
Sharing privately: Only certain people can access your document
In most cases, business users will want to share files privately — that is, restrict access to specific people or groups. Inside the “Add people and groups” box on the Share pane, type in the names or email addresses of the people you want to collaborate with on the document. As you start to type, Google will suggest matches from your contacts; click a name or group to add it. You can also type in a brief message to the recipients.
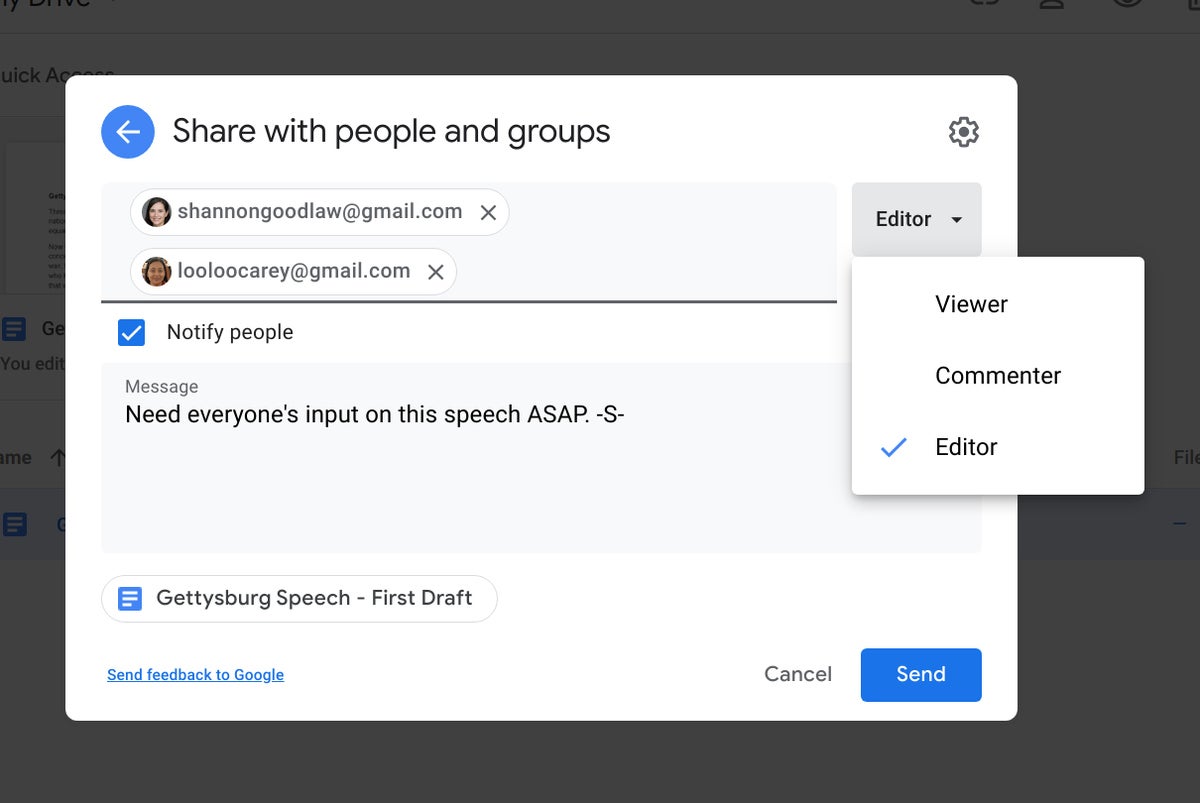
By default, every person you add is given Editor access to your document. You can change this by clicking Editor and selecting Viewer or Commenter instead. Here’s how the three permissions break down:
- A Viewer can scroll through and read your document but can’t change it or share it with others.
- A Commenter can view the document and add comments and suggestions to it but can’t change the document itself or share it.
- An Editor can view, comment on, and edit the document (change text, add images, and so on) and share it with others.
Important: Whether you choose Viewer, Commenter, or Editor in the Share pane, keep in mind that this setting applies to all people you’re currently inviting to the document. If you want to give different people different levels of permission, you’ll need to invite them individually or in separate batches, with different access rights assigned each time.
You can also fine-tune these access settings. Click the gear icon in the upper right of the Share pane to turn off the following items:
- Uncheck the Editors can change permissions and share box if you don’t want those with Editor privileges to be able to share the document with others or change others’ Viewer, Commentor, or Editor status.
- Uncheck the Viewers and commenters can see the option to download, print, and copy box if you don’t want those with Viewer or Commenter access to be able to download, print, or make a copy of your document.
- make a copy of your document.
Note: If a person you’re sharing your document with privately has a Google account (such as a Gmail account), they can immediately work on it as a Commenter or Editor as long as they’re signed into their account. Otherwise, they will have to register for a free Google account.
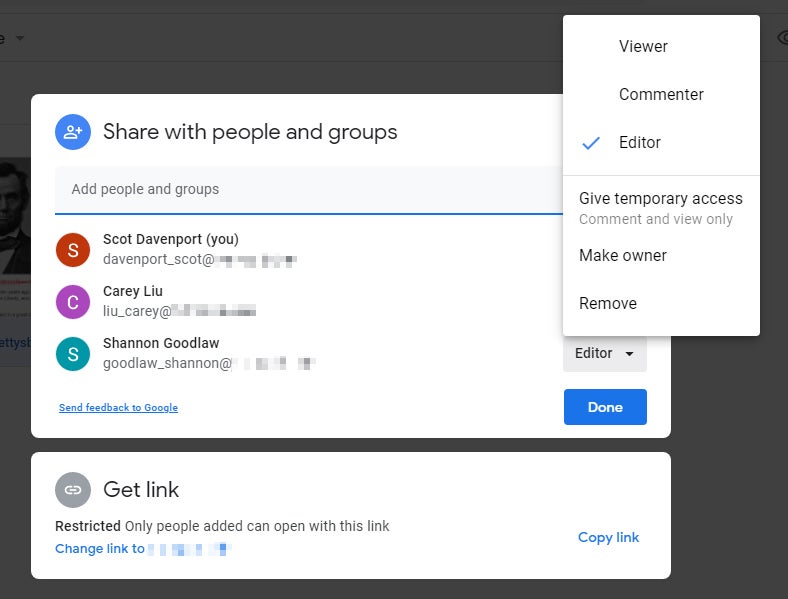
You can change a person’s access to the document at any time. Call up the Share pane, click the button to the right of their name with their access title (Viewer, Commenter, or Editor), and select a different access title from the menu that appears. To revoke the person’s access to the document, click Remove from the menu. When you’ve made a selection, click Save.
Setting an expiration date for a privately shared document
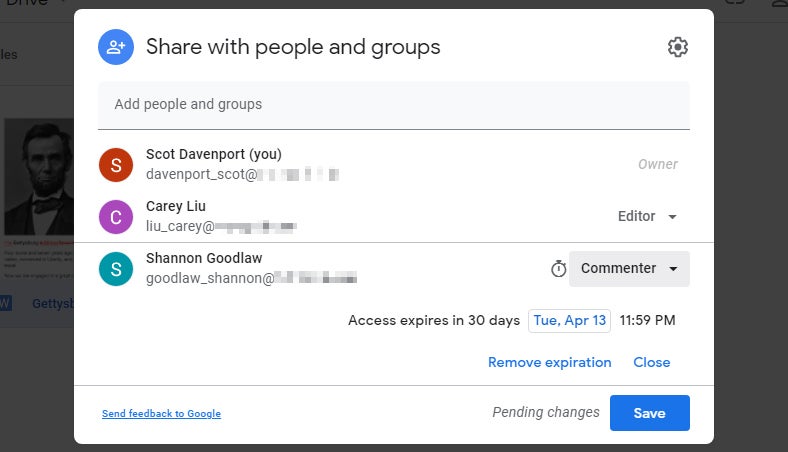
Under a Google Workspace plan, a person assigned Viewer or Commenter access to your document can be denied access to it on a specified date. If they were assigned as Editor, they will be demoted to Commenter on a specified date.
Open the Share pane. Click the button to the right of a collaborator’s name that shows their access title (Viewer, Commenter, or Editor) and select Give temporary access from the menu that appears. Then, next to “Access expires…,” click the current date and change the number of days that you want that person to have access to your document.
Sharing publicly: Anyone can access your document
In some cases, you might want to share a document publicly, letting anyone view, edit, or comment on it. In the Share pane, go to the “Get link” area and click “Change to anyone with the link.” A link to your document will be generated that you can copy and paste. Anyone who clicks this link (whether you or someone else shares it with them) will be able to view your document.
By default, the permission for public links is set to Viewer. To allow anyone with the link to comment on or edit your document, click Viewer on the right and select Commenter or Editor.
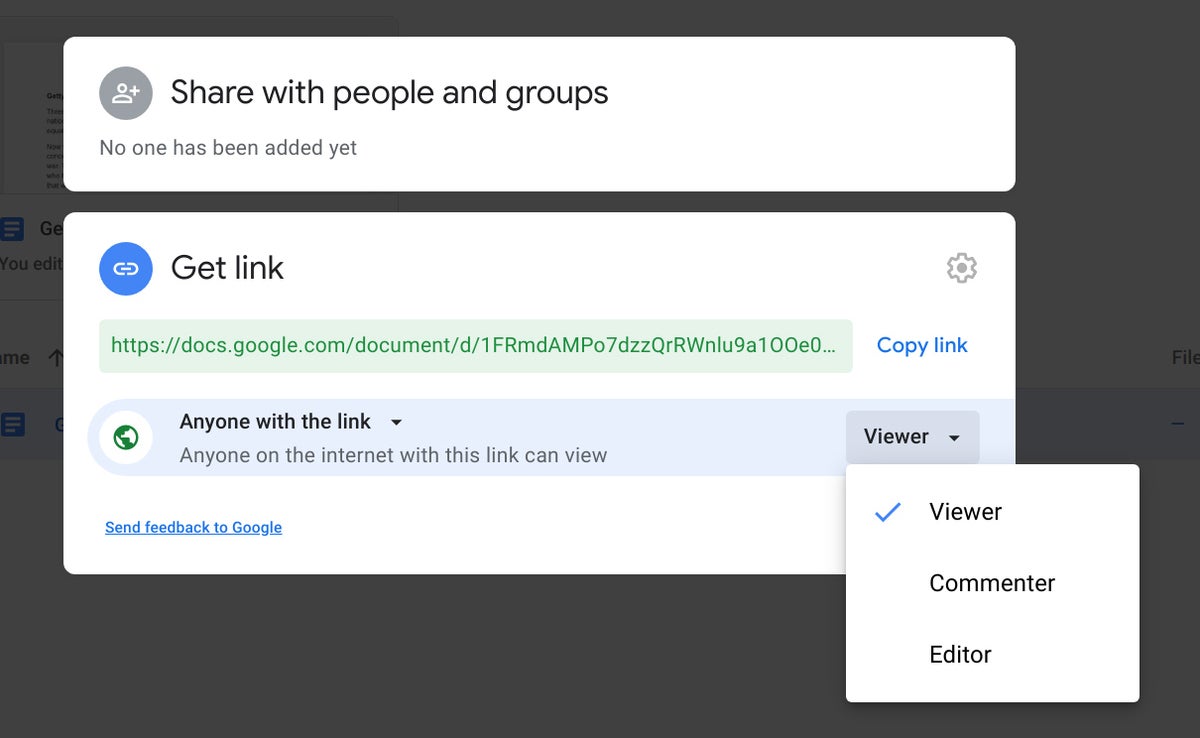
Keep in mind that anyone with the public link to your document can access it whether they get the link from you directly, someone else sends it to them, or they find it through some other means. That’s why it’s important to use public links with great caution, especially when assigning Commenter or Editor access to a link.
Unlike with privately shared documents, people collaborating on publicly shared documents don’t need to have a Google account. If they’re not signed in to a Google account when they access the document, they will appear as an anonymous contributor.
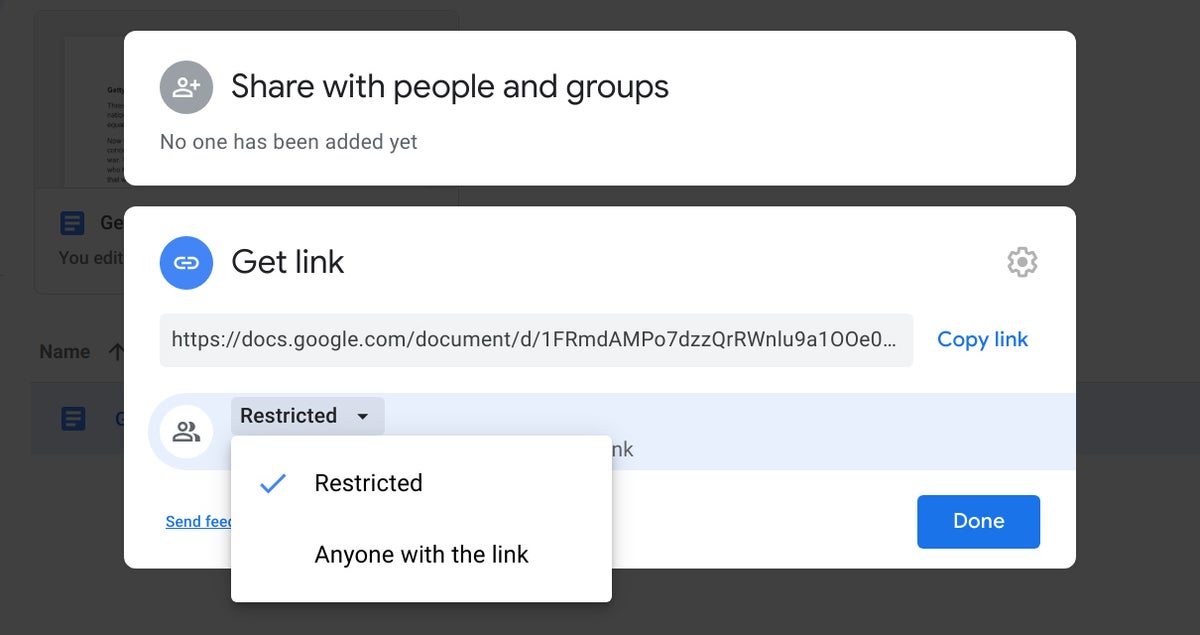
You can turn off the public link to your document at any time by reopening the Share pane and clicking “Change” in the “Get link” area. Then click “Anyone with the link” and select “Restricted.”
Sharing a document from the Google Drive, Docs, Sheets, and Slides mobile apps
On the home screen of any Google Drive, Docs, Sheets, or Slides mobile app, tap the three dots to the right of the document’s file name. On the pane that scrolls up, tap Share. This opens the Share screen.
To open the Share screen when you have a document open in the Google Docs, Sheets, or Slides mobile app, tap the Share icon (a head silhouette) at the upper-right corner.
On the Share screen, type in the names or email addresses of people you want to invite to collaborate on your document. As you start to type, Google will suggest matches from your contacts; tap a name or group to add it. You can also type in a brief message. If you want to change the recipients’ access rights from Editor, click the Editor drop-down and choose Viewer or Commenter.
At the bottom of the Share screen, tap anywhere below “Who has access.” This opens a screen that lists who has been given access to your document and their type of access (Viewer, Commenter, Editor). To change their access type, or to remove their access entirely, tap their name.
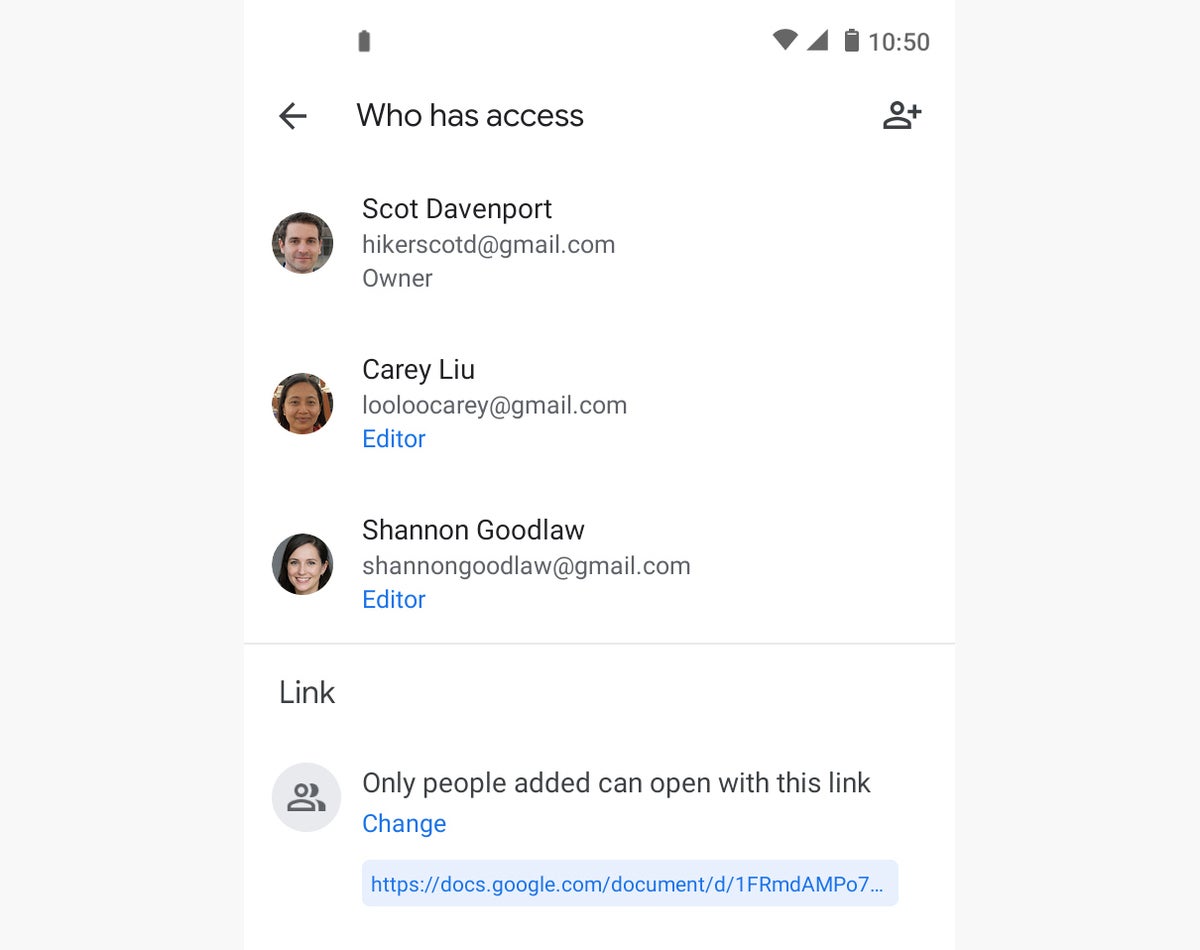
To publicly share your document, tap Only people added can open with this link at the bottom of the “Who has access” screen. On the pane that scrolls up, tap to select Viewer, Commenter, or Editor. The text in the “Link” area on the main screen will change to say, “Anyone on the internet with this link can comment” (or “can view” or “can edit,” depending on your selection.) Tap the link and select Copy link to save the link to your phone’s clipboard, which you can paste into an email or message.
Status of your shared documents
On your Google Drive home page, your documents that are being shared with others are marked by an icon of two silhouetted heads to the right of the document name.
Note: If you have the page set to Grid view, this icon won’t appear with the thumbnail or filename of a shared document.
It’s even easier to find documents that others have shared with you. Along the left side of your Google Drive home page, click Shared with me to see a list of documents that others are sharing with you.
The home screens of the mobile apps also use silhouetted heads to indicate documents you’ve shared.
To see a list of the documents that others are sharing with you in the Google Drive app, tap the silhouetted heads icon at the bottom of the screen. In the Google Docs, Sheets, or Slides apps, tap the three-line icon in the upper-left corner. On the panel that scrolls in, tap Shared with me.
Credit: Howard Wen, Computerworld


