How to use Google Slides to create, collaborate on, and lead business presentations.
gorodenkoff / filo / Getty Images / Google
This guide familiarizes you with the interface and shows you how to start a new presentation; upload and edit one that you have stored on your PC’s hard drive, such as a Microsoft PowerPoint presentation; collaborate with others on a presentation; and, of course, present it. This guide is written with the assumption that you know the basics of designing presentations.
In addition to the web app, Google offers a Slides mobile app for Android and iOS. We cover a few notable differences with the mobile app.
Share this story: G Suite administrators, we hope you’ll pass this guide on to your users to help them get up to speed with Google Slides.
Create or open a presentation
You can create a new presentation, or load one you’ve already saved in Google Drive, through the Google Slides home page or the Google Drive home page. You’ll need to sign in to your Google or G Suite account if you haven’t already.
In Google Slides: At the top of the home page you’ll see a “Start a new presentation” header, with a row of thumbnails underneath. Below that you’ll see a list of Google Slides presentations you have stored in Google Drive or that are stored in someone else’s Drive and shared with you.
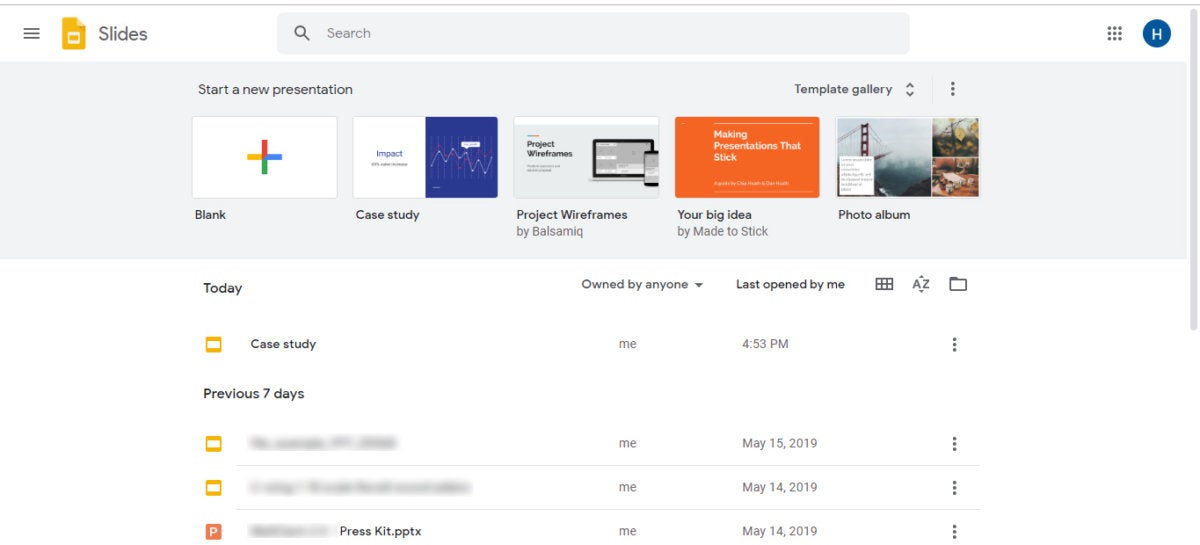
The Google Slides home page. (Click image to enlarge it.)
To open a presentation stored in Drive, click it in the list below.
By default, the presentations list appears in reverse chronological order starting with the presentation you most recently opened. Clicking the “AZ” icon at the upper right of this list to change the sort order to “Last modified by me,” “Last modified” (by anyone with access to the presentation), or in alphabetical order by presentation title. You can also browse to a specific folder by clicking the folder icon next to the AZ icon.
Use the search box at the very top of the screen to search on a word or phrase; if it appears in a presentation title or the body of a presentation, it’ll appear in the search results.
In Google Drive: To start a new blank presentation, click the New button at the upper-left of the screen and then click “Google Slides.”
If you want to select a template to start a new presentation, click the New button, then move the cursor over the “>” to the right of “Google Slides” and select “From a template.” Google Slides will open, showing its full template gallery; click a thumbnail to start a new presentation in that template.
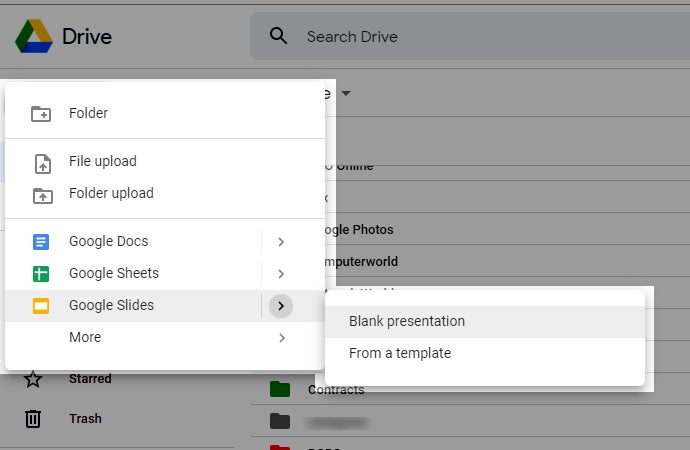
Creating a new presentation in Google DriveYour presentations that are already stored in Google Drive are listed in the main area of the Drive home page under “My Drive.” Double-click the one you want to view or edit, and it will open in Google Slides.
To open a presentation that someone else has shared with you via Google Drive, click “Shared with me” in the left column, then double-click the presentation you want in the main listing area.
Alternatively, use the Search box at the very top of the screen to search for a word or phrase that appears in any presentation you have access to in Drive, whether you own it or it’s been shared with you.
Upload a Microsoft PowerPoint presentation for editing in Google Slides
If you want to edit a presentation that’s not already stored in your Google Drive, you must first upload it to Drive. You can do this from either Slides or Drive, but somewhat different things might happen with each approach.
 IDG
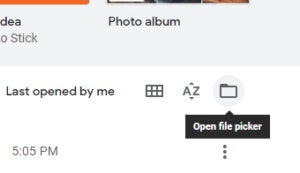
IDGTo upload a presentation in Slides, click this button.
From Google Slides: To upload a file from the Slides home page, click the folder icon above the presentations list, then click the Upload tab on the screen that appears. You can drag and drop a file onto the screen, or browse your computer’s hard drive and select a file.
If you upload a Microsoft PowerPoint (.ppt or .pptx) presentation, it’s automatically converted so that you can edit it in Google Slides. It appears listed on your Google Slides and Google Drive home pages.
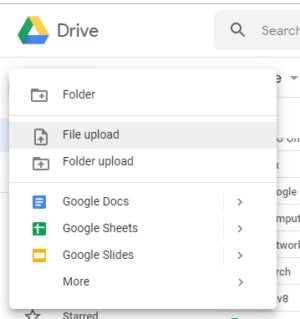
From Google Drive: To upload a presentation via the Google Drive home page, click the New button, then “File upload,” and select the presentation from your PC’s drive.
 IDG
IDGUploading a presentation in Google Drive.
Depending on how Google Drive is configured, Microsoft PowerPoint files may or may not be converted to Slides format. Click the gear icon in the upper-right corner of the Drive home page and select Settings from the drop-down menu. In the Settings box next to “Convert uploads” you’ll see a checkbox marked “Convert uploaded files to Google Docs editor format.” Check it if you want PowerPoint files to be automatically converted to Slides for editing, and uncheck it if you don’t.
Why wouldn’t you want to convert files to Slides format when you upload them? Google announced a new feature at its Cloud Next conference in April: the ability to edit Microsoft Office-formatted files in Google Docs, Sheets, and Slides without converting them first. The idea is to make it easier for users whose colleagues use Office. Instead of converting a file to Slides format and then back to PowerPoint format to send back to an Office-using colleague, Slides users can edit and collaborate on a native PowerPoint presentation right in Slides, with all changes made by you or your collaborators saved directly to the PowerPoint file.
 IDG
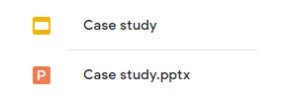
IDGMicrosoft PowerPoint files show the PowerPoint icon instead of the Google Sheets icon.
If you choose to upload PowerPoint files in their native format, they appear listed on your Google Slides home page and Google Drive home page with a PowerPoint icon next to them instead of the usual Slides icon.
When you double-click a PowerPoint file on the Drive home page, it opens in read-only mode. To edit it, click the “Open with Google Slides” button at the top of the page; the file opens in a new Google Slides browser tab. To open a PowerPoint presentation from the Slides home page, click it in the presentations list and choose “Edit in Google Slides.” To the right of the document’s title you’ll see a yellow .PPTX label. Any changes you make are saved in this original PowerPoint-formatted file.
 IDG
IDGThe yellow .PPTX icon tells you that you’re editing a PowerPoint-formatted document.
Work on a presentation
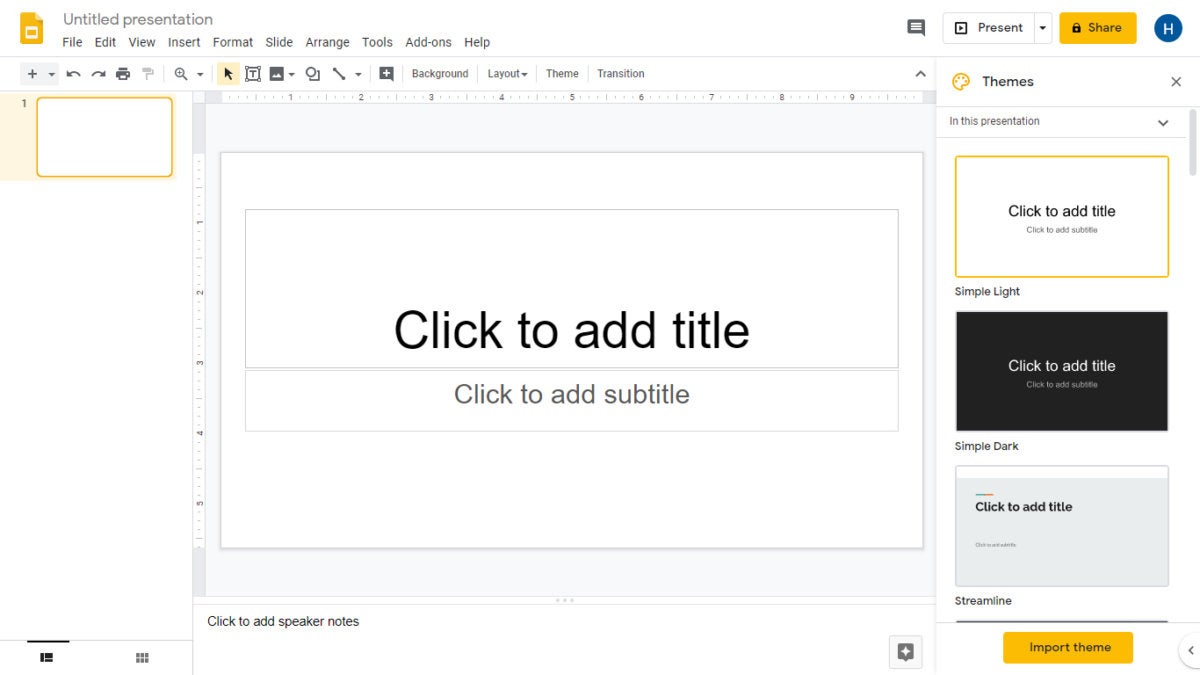
Whether you open a new or existing presentation, its first slide appears in the main window of Google Slides. The formatting toolbar above it has buttons for inserting design elements onto it, such as text, images, shapes and lines. Other buttons on the toolbar let you add a comment to the slide; change its background, layout, or the design theme of the entire presentation; and add or change the animated transition effect that introduces this slide when the presentation is played.
IDG
The Google Slides editing interface. (Click image to enlarge it.)
The menu bar toward the top of the screen contains the same tools that are on the formatting toolbar — and many more. Under the Insert menu are commands for inserting a table, chart, diagram or link to a YouTube video or a video file that you’ve stored on your Google Drive. Using the Slide menu, you take actions to manage your slides, such as copying, deleting or rearranging their order in the slideshow sequence. The Arrange menu helps you manipulate graphical elements on a slide when you are designing it.
 IDG
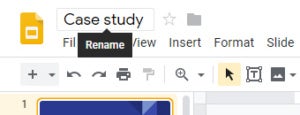
IDGRenaming a presentation.
Your presentation’s title appears at the top-left of the screen, above the menu bar. To change it, click the title — you can highlight the words and edit them. There’s no need to “Save as” under a different title. In fact, there’s no need to save at all; Slides automatically saves any changes you make to your presentation as soon as you make them.
The slides in your presentation appear as thumbnails in a pane to the left of the screen. Click a thumbnail, and the slide it represents appears in the main viewing window, where you can edit it.
When you start a new presentation by clicking Blank, a Themes sidebar pane opens on the right side, with thumbnails for different themes that the presentation can be changed to.
You can add brief “speaker notes” in the “Click to add speaker notes” area along the bottom of each slide. These words are shown only to you when your presentation is being played to your audience. You may want to add notes here to remind yourself what to do or say when the slide is being shown.
Change slide layouts and transitions
Two elements about slide presentation design that you should know how to access from the Google Sheets menu bar: the master layout and animated transition effect for a slide.
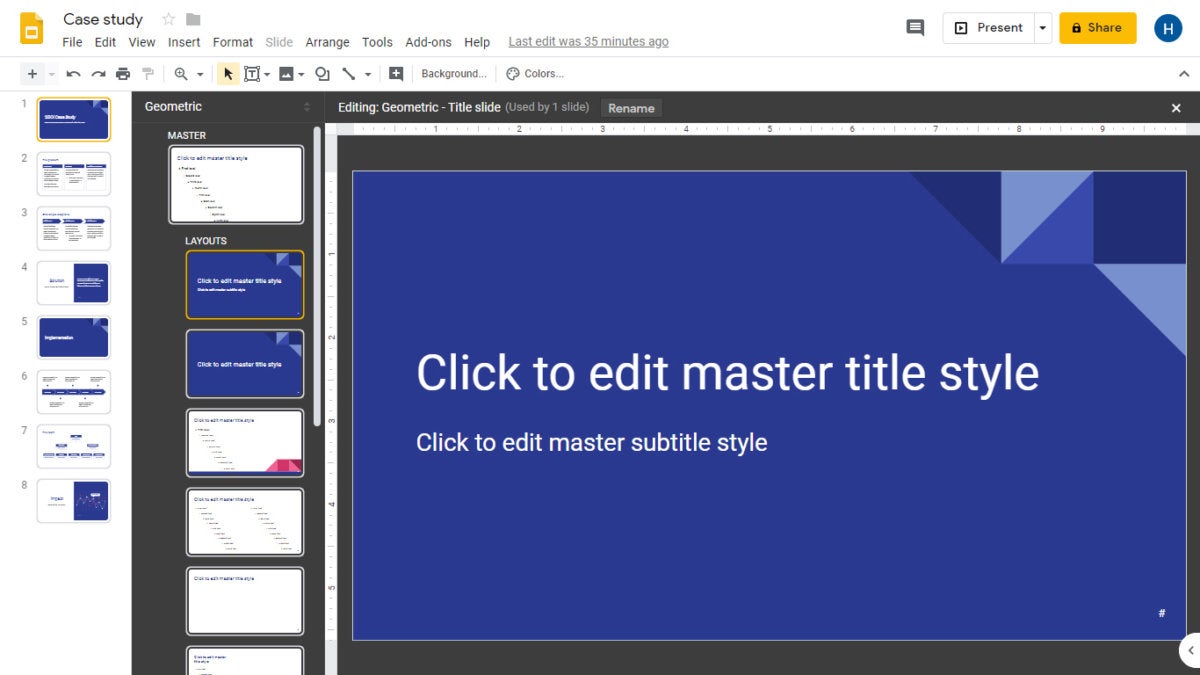
View or edit a slide layout: To view the layout of a slide, click to select the slide in the thumbnail toolbar and click View > Master. To edit the layout, select Slide > Edit master. Both actions replace the main window where your selected slide is shown with a dark-themed mode where you can view or edit its master layout.
IDG
Editing a presentation’s master slide layouts. (Click image to enlarge it.)
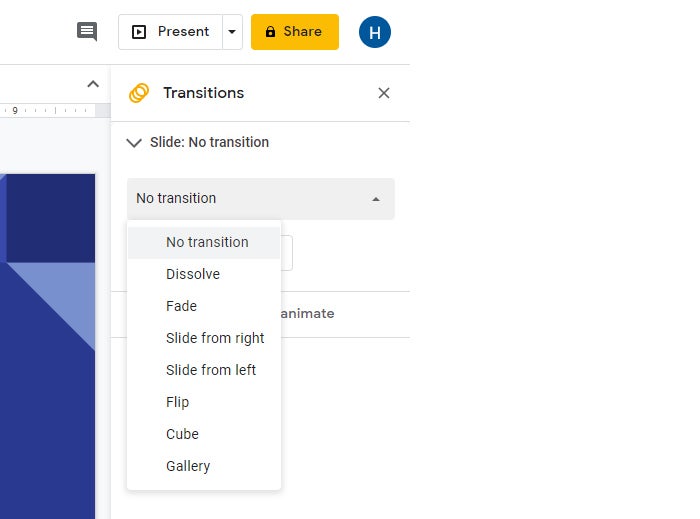
View or edit a slide transition: To view the animated transition effect that brings in the slide when your presentation is played, click to select the slide in the thumbnail toolbar and click View > Animations. To edit the transition, select Slide > Change transition. Both actions bring in a Transitions tool pane along the right side of the screen, where you can choose from a variety of transition styles.
 IDG
IDGChoosing a transition style in the Transitions pane.
Manage the slides in a presentation
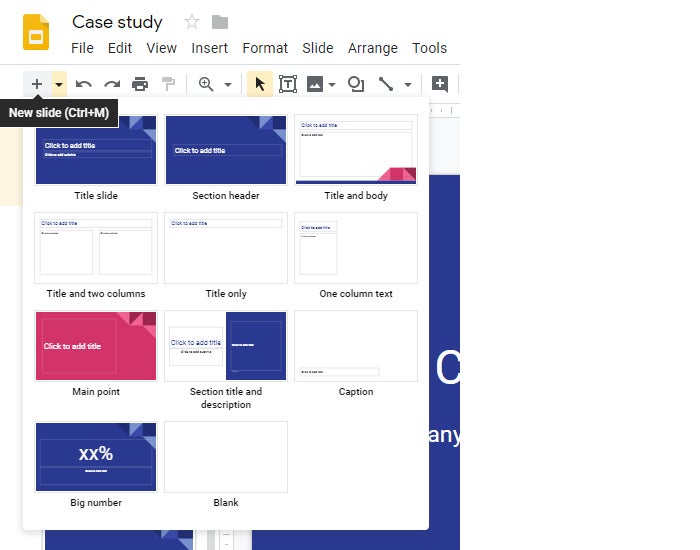
To add a new, blank slide to your presentation, click the “+” button at the left end of the formatting toolbar. Alternatively, if you click the down arrow by the “+”, you can choose a layout to use as the basis for a new slide.
 IDG
IDGClick the down arrow next to the + button to choose a layout for a new slide.
To move a slide to a different spot in the slideshow sequence, click and hold its thumbnail in the left pane, drag it up or down to another place in the sequence, and release it.
To delete a slide, right-click its thumbnail on the sidebar and select “Delete” from the pop-up menu. Alternatively, select its thumbnail and select Edit > Delete from the menu bar or just press the Delete key.
Get suggested layouts and content for a slide with the Explore tool
In the lower-right corner of your screen is the Explore icon. It’s usually colored gray. But if you click in a slide in the main viewing window or on a thumbnail in the left pane and the Explore icon turns orange, it means Google Slides has a suggestion to help you with the slide’s layout.
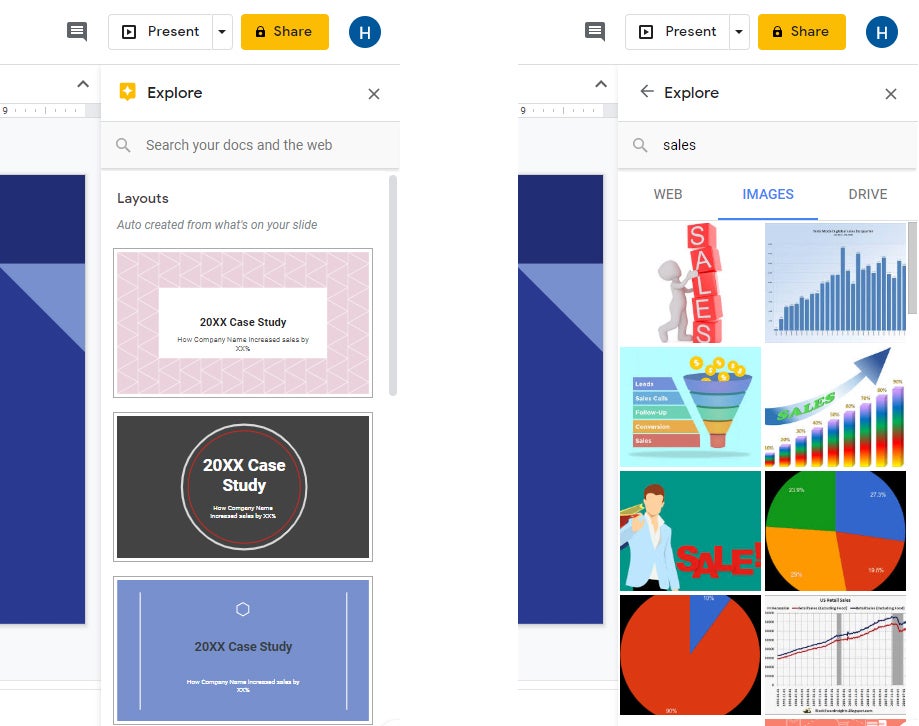
Click the Explore icon, and a panel opens showing a variety of layout designs you can use for the slide. To select a suggested layout, just click it, and your text and images on the slide will transfer over to the new layout. (If the Explore icon is gray, you can still click it; that forces Slides to check if it has any layout suggestions for the selected slide.)
IDG
Using the Explore tool to get suggested layouts (left) and search for images (right). (Click image to enlarge it.)
You can also use the Explore tool to find content for the slide. At the top of the Explore pane is a search box; type in a word or phrase, and the tool will search the web for related content. Click the Images tab in the Explore pane to see thumbnails for images related to your search term or the Drive tab to search your own Google Drive files as well as files others have shared with you in Google Drive.
Clicking a web or Drive result opens it in a new browser tab. Clicking the plus sign for an image thumbnail inserts it into your slide, while clicking the thumbnail itself enlarges it so you can see it better and decide whether to use it.
For more information, refer to Google’s help page “See and use suggested layouts in a presentation.”
Recover older versions of a presentation
When you have a presentation open, you can look at older versions of it that were saved automatically by Google Slides and revert the presentation to one of those earlier versions. This can be useful for repairing editing mistakes made by you or others on a shared file.
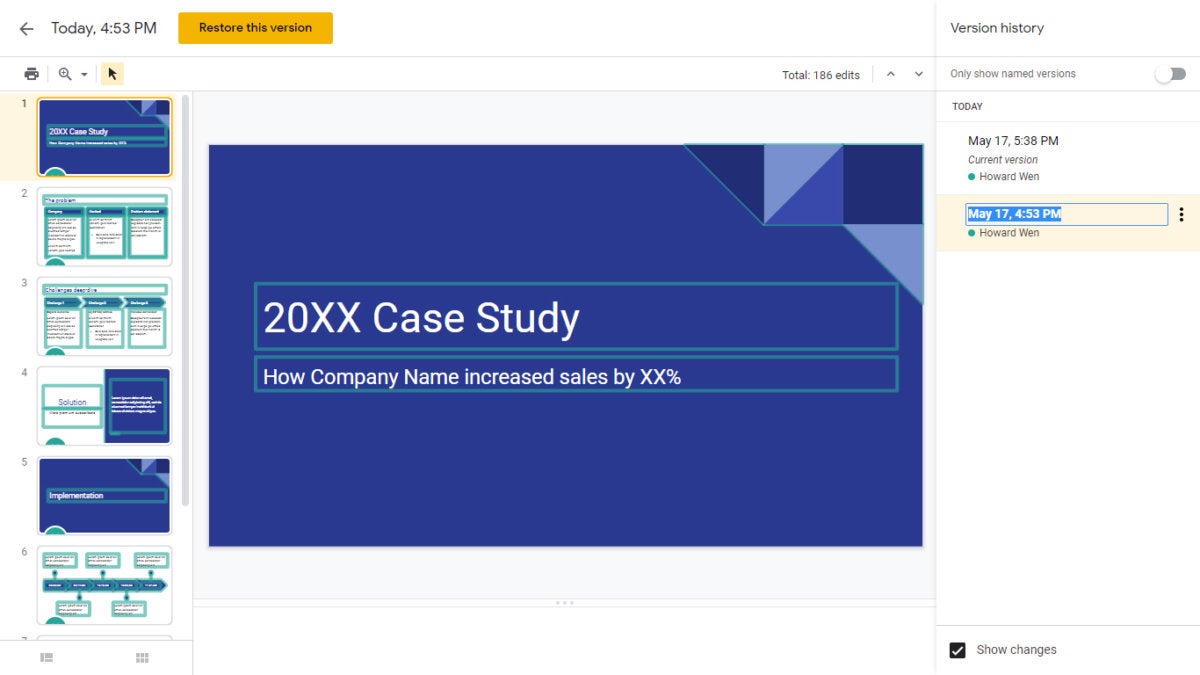
Click File > Version history > See version history. This opens a panel on the right that shows a list of older versions of the presentation, organized by date and time.
IDG
Using Version history to view an earlier version of a presentation. (Click image to enlarge it.)
To give an older version a unique name, click on its date. You’ll be prompted to type in words to replace the date. The date and time will then appear in smaller type underneath the new name.
To see what an earlier version of the presentation looks like, click its date or version name in the list on the right. That version of the presentation appears in the main window.
To restore that version so it replaces the current one, click the yellow “Restore this version” button at the upper-left of the screen. The restored version appears at the top of the version history list, and the version you were looking at prior to restoring the earlier one becomes the second item in the list.
Share and collaborate on a presentation
Presentations are often a group effort, with several team members contributing to and polishing a presentation. In Slides, it’s easy for multiple collaborators to work on a presentation together. From the Slides screen where you’re editing your presentation, click the yellow Share button at the upper-right. A “Share with others” screen appears over the presentation.
 IDG
IDGClick the Share button to share a presentation in Slides.
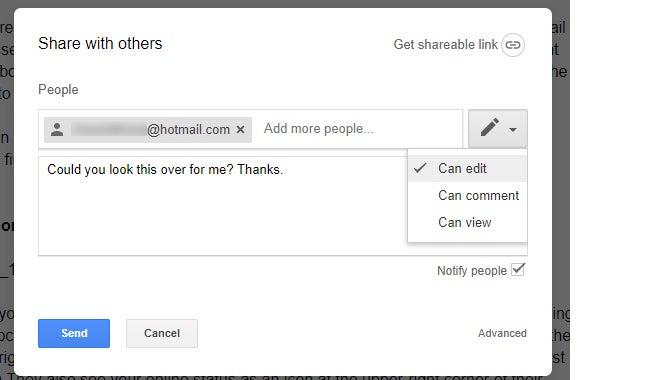
To share the presentation privately: Enter the email addresses (or names of your Google Contacts) of the people with whom you want to share in the entry box. By default, people you invite to the presentation can edit it and share it with others.
To set it so that people you invite can add comments to your presentation but not edit it, click the pencil icon to the right of the box and choose “Can comment.” Or, to allow them to view your presentation but not edit it or add comments, click the pencil icon and choose “Can view.”
 IDG
IDGSetting permissions for a file being shared privately.
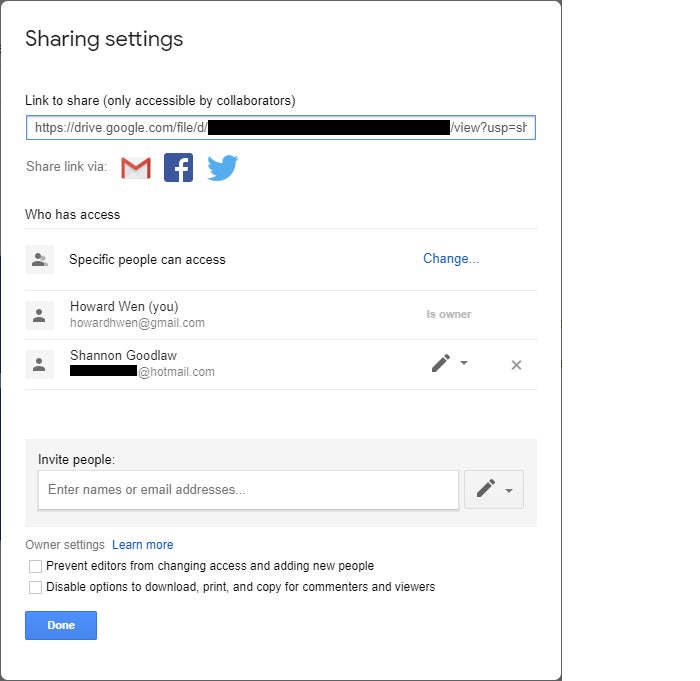
To prevent collaborators from sharing the spreadsheet with others, click “Advanced” at the bottom of the “Share with others” panel. This expands the panel, revealing all the settings for sharing your presentation. Check the box marked “Prevent editors from changing access and adding new people.” (The checkbox below it lets you prevent those with comment and view permissions from downloading, printing, or copying the spreadsheet.)
 IDG
IDGThe Sharing settings screen lets you change collaborators’ permissions, prevent additional sharing, and disallow downloading, printing, and copying.
G Suite and Drive Enterprise subscribers can also set an expiration date for a shared presentation in the advanced “Sharing settings” pane. After this date passes, the person or people you’ve shared the presentation with will no longer be able to view it. To do this, hover your cursor over a collaborator’s name, and a stopwatch icon appears. Click it, then click the drop-down next to “Access expires” to set the person’s access to expire in 7 days, 30 days, or on a date you select. Expiration dates cannot be set for collaborators with edit access, only comment or view access.
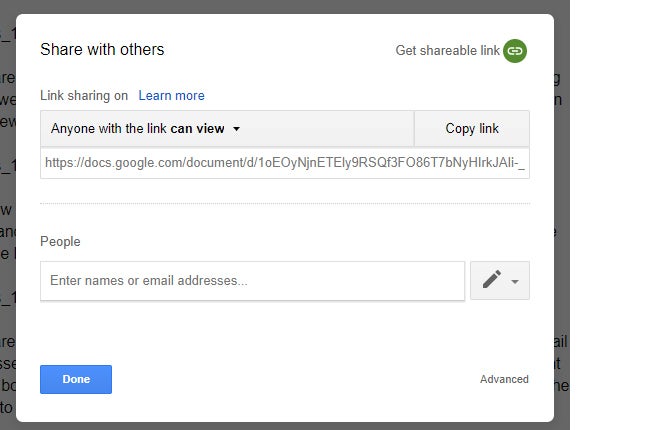
To share the presentation publicly: On the “Share with others” screen, click the chain icon by “Get shareable link.” A panel opens, showing you a web link that you can share with other people (and that they can share with others). Anyone who has the link can access your presentation, so think carefully before choosing this option. For business purposes, it’s probably better to invite specific people privately.
 IDG
IDGGetting a public sharing link for a presentation.
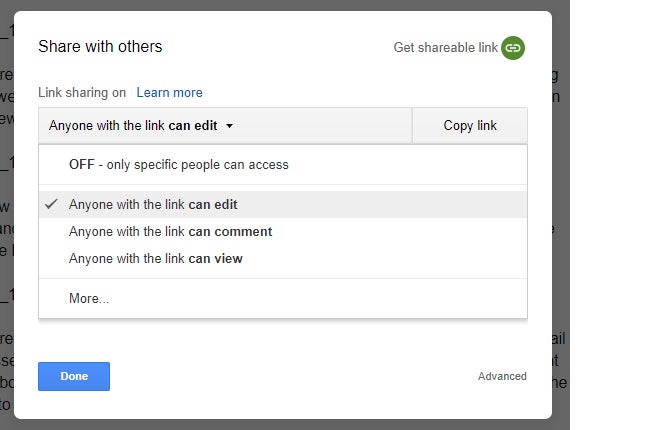
By default, anyone with the sharing link can only view your presentation. To allow anyone to comment on or edit your presentation, click “Anyone with the link can view” and select “Anyone with the link can edit” or “Anyone with the link can comment” from the drop-down menu. To turn the sharing link off, select “OFF – only specific people can access” from the same drop-down menu.
 IDG
IDGClick the drop-down to change access permissions or remove the shareable link.
Remember, if you turn on the public sharing link to your presentation and set it so that the public can edit it, then anyone with access to that link can change your presentation!
You can use both public and private sharing options for the same presentation — for instance, you could allow the public to view your presentation but let only specific people edit or comment on it.
Any presentation you’ve shared (or that others have shared with you) will have an icon of two silhouetted heads next to it in the presentation list on your Google Slides home page.
 IDG
IDGThe shared presentation icon in the listing on the Google Slides home page.
You can also share a presentation from Google Drive, including from a Team Drive, without having to open it first in Google Slides. See “How to share a document for collaboration” (for sharing from My Drive) and “How to share documents in Team Drives” (for sharing from Team Drives) in our quick guide to using Google Drive for collaboration.
To collaborate on the presentation: The people you’ve shared a presentation with can view, comment on, or edit it (depending on the permissions you’ve granted them) at the same time as you, or at any time that’s convenient.
If you’ve given them edit permissions, they can directly edit the slides in the presentation. That’s fine for correcting factual errors or misspellings, but we’ve found that for making larger suggestions in Slides, adding comments works better. Collaborators can attach comments to a whole slide or a specific item in it, but their suggestions don’t interfere with the slide layout or formatting.
To add a comment to a presentation: Click on a slide thumbnail in the left pane or on the slide itself in the main viewing window, or select an image or text on the slide, and click the “Add comment” icon on the toolbar at the top of your presentation.
 IDG
IDGClick the “Add comment” icon to, well, add a comment.
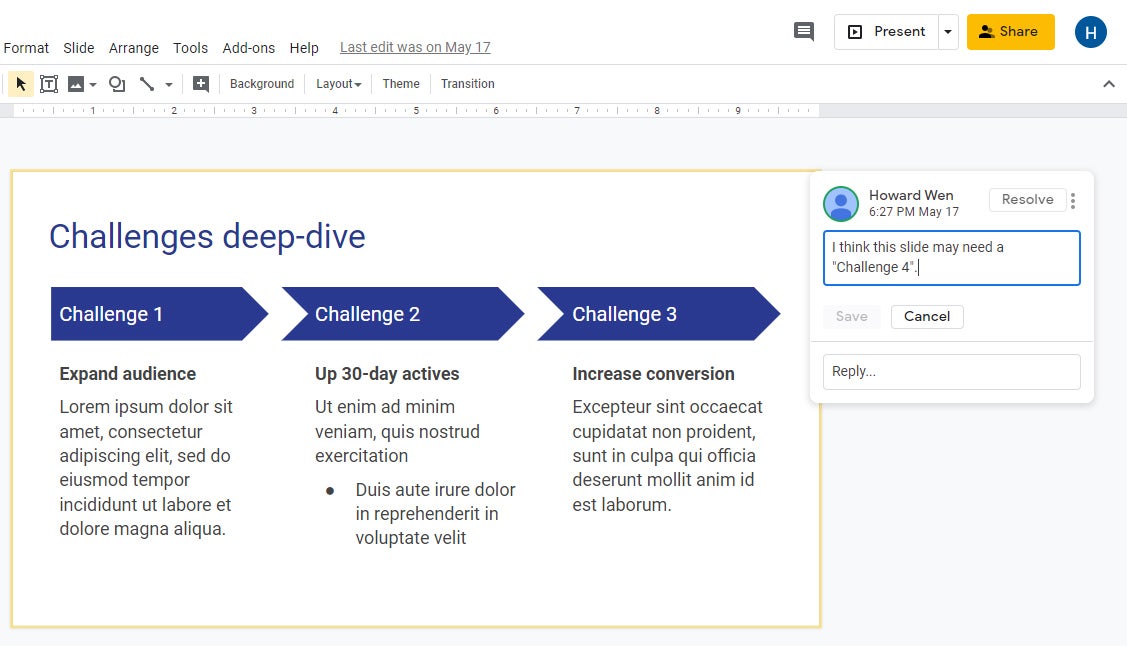
A comment box opens to the right of the slide. It has your name across the top and an entry line where you can type in a brief comment about the selected item. When you’re done typing, click the Comment button.
IDG
Typing a new comment. (Click image to enlarge it.)
A note card appears to the right of any slide with a comment from you or a collaborator. Clicking this card expands it to reveal an entry line (“Reply…”) where you can add more comments to it. Any replies to a comment appear stacked below it.

IDG
A comment with a response. (Click image to enlarge it.)
Clicking the Resolve button closes the card and removes it from the presentation.
 IDG
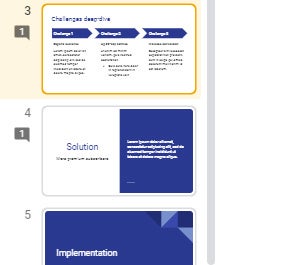
IDGSlides with comments have a numerical icon to the left of their thumbnails.
You can instantly see which slides have comments on them by looking in the preview pane on the left; any slide with a comment has an icon to its left indicating the number of comments.
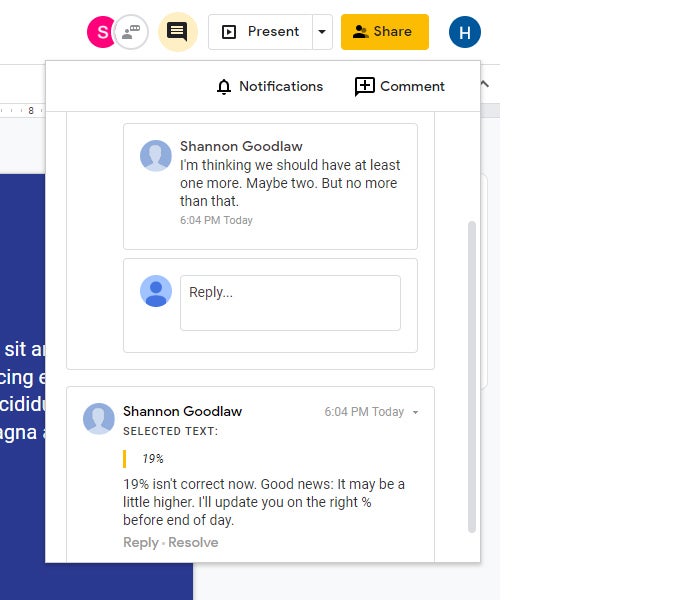
To see a listing of all the comments in the presentation, including ones that have been marked resolved, click the “Open comment history” icon (it looks like a conversation bubble with text on it) toward the upper-right of the page. This listing helps you go through all the comments that have been added to the presentation without having to hunt for them. Clicking a comment in this listing jumps to the slide where the comment is located.
 IDG
IDGThe comments pane lets you quickly review all comments and jump to specific ones.
You can reply to, or resolve, the comment from within the listing, but not directly on the slide unless you click the slide itself. Clicking the slide closes the comments listing pane and reveals any comment boxes that are set to the right of a slide.
For more details about collaborating on your presentation, including what it’s like to collaborate in real time, see “How to collaborate on a document” in our Google Drive guide.
Give a presentation
When it’s time to play your presentation, Google Sheets has two presenter modes: Present and Presenter view. Present mode essentially shows what your audience will see, while Presenter view mode has a few extras for your eyes only.
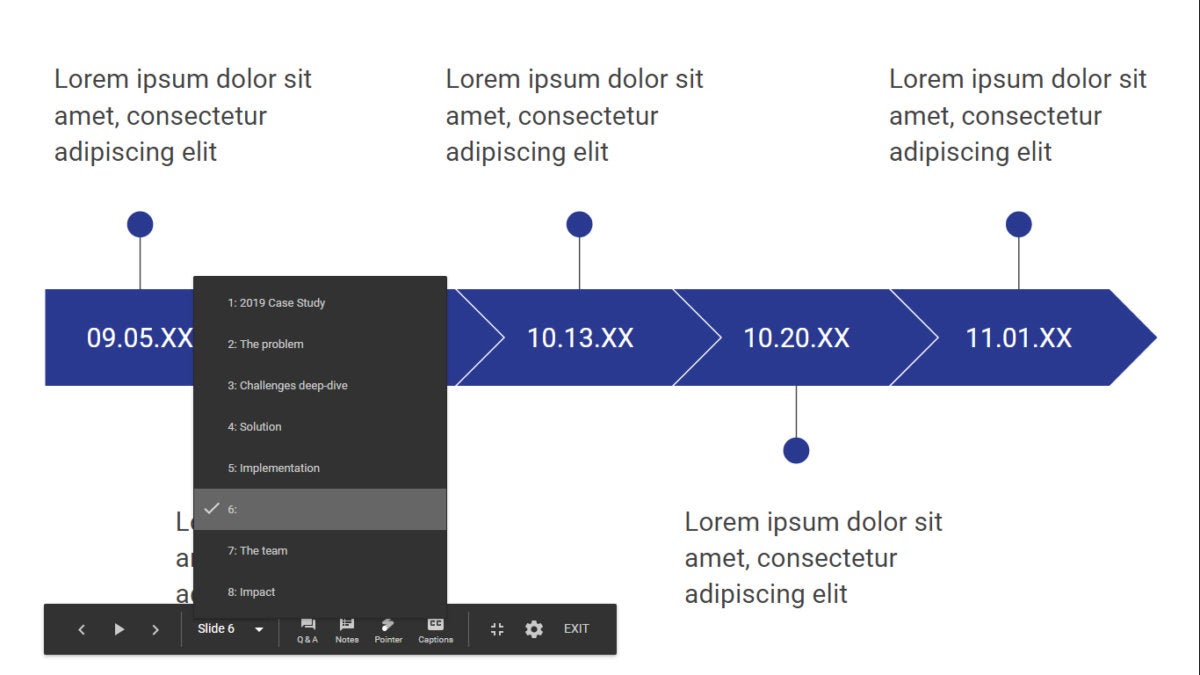
Present mode: To use this mode, click the Present button at the upper-right corner of the screen. Google Sheets will expand your screen to a full-screen view, showing the slide you’re currently on. If you want to start the slideshow from the beginning, instead of clicking the Present button itself, click the down arrow to its right and select “Present from beginning.”
When you move the cursor with your mouse or touchpad, a control bar appears over the lower-left of your presentation. If you want the slideshow to play automatically, click the play button on the control bar; clicking the same button again pauses playback. You can also use the bar to manually move forward or back in the slides or jump directly to a specific slide in the sequence.
IDG
Viewing a presentation in Present mode. (Click image to enlarge it.)
The Pointer button on the control bar turns your mouse cursor into a laser pointer; click it again to toggle it off. If you’re using the Chrome browser, you’ll also see a Captions button that transcribes your words as you speak (English only) and shows them on-screen to your audience.
Clicking the Q&A or Notes button takes your presentation out of full-screen mode and opens a second “Presenter view” window. In other words, it takes you into Presenter view mode.
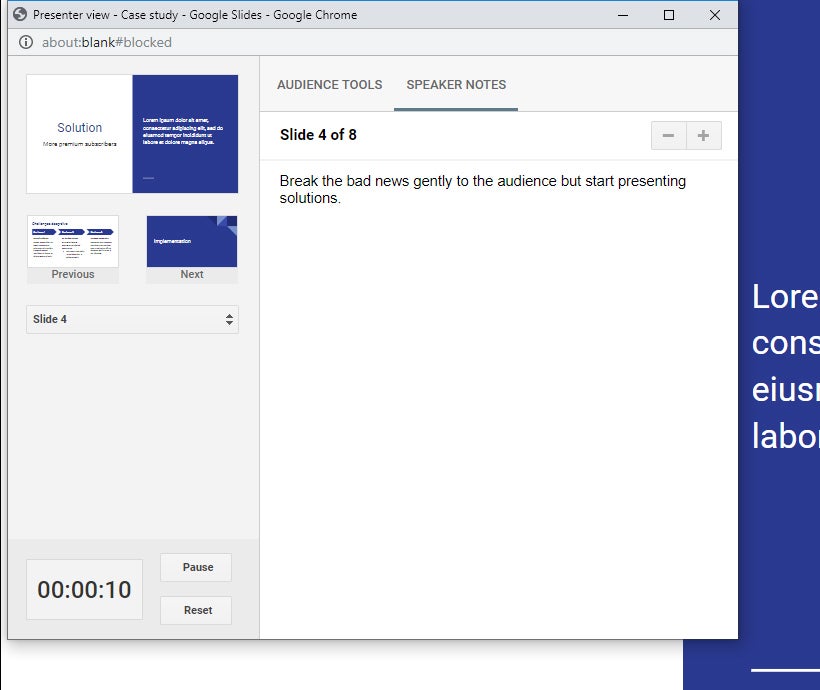
Presenter view mode: This is basically Present mode with an additional, separate window, where you can view your speaker notes for each slide and control the Google Slides’ Q&A function. The Presenter view window also lets you control playback and navigate through your slides. You can directly go into this mode from the main Slides interface by clicking the down arrow next to the Present button and selecting “Presenter view” from the drop-down menu.
IDG
Presenter view lets you see your speaker notes and other controls while presenting. (Click image to enlarge it.)
If you click the “Presenter view” option from the main screen or the Notes button on the control bar in Present mode, the Presenter view window displays the Speaker Notes tab on the right. If you click the Audience Tools tab in the Presenter view window or click the Q&A button from Present mode, you’ll see the Audience Tools tab, where you can use the Q&A function.
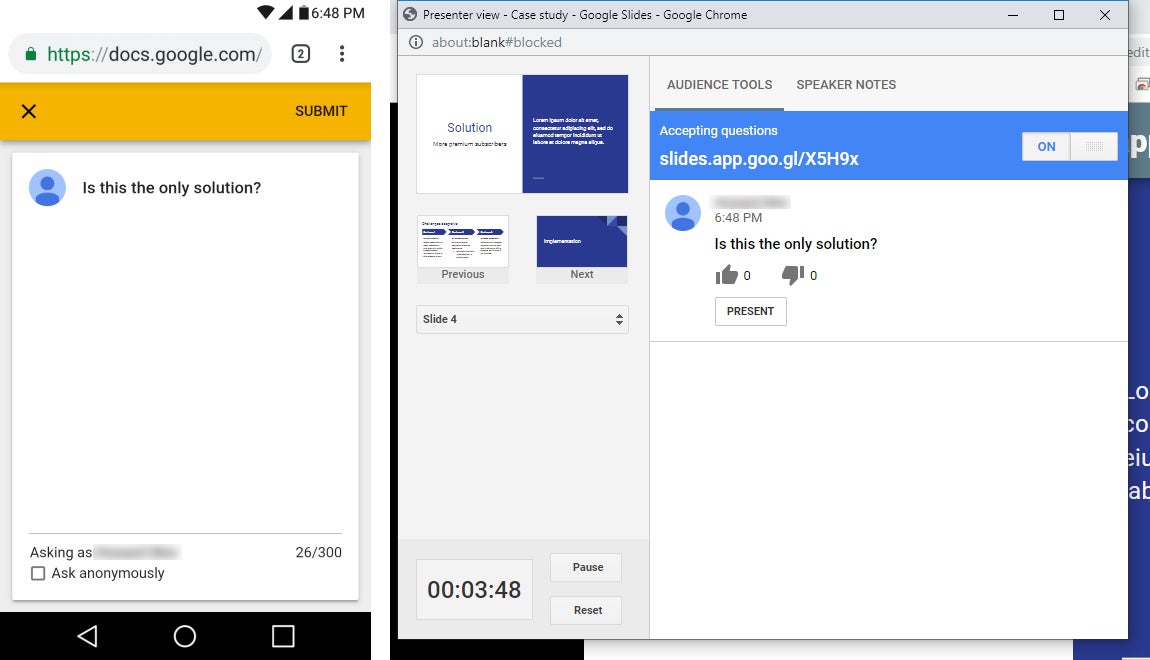
This tool helps you take questions from remote audience members as they watch your presentation. When you enable Q&A by clicking the “Start new” button, your audience sees a link toward the top of your presentation. An audience member can click that link in the web browser on their phone or computer and then type a question for you. In the Presenter view window, you can choose to show their question in the midst of the presentation for the audience to see as you answer it.
IDG
Audience members can submit questions from their devices (left), and the presenter can decide whether to display them as part of the slideshow (right). (Click image to enlarge it.)
Download and export a presentation
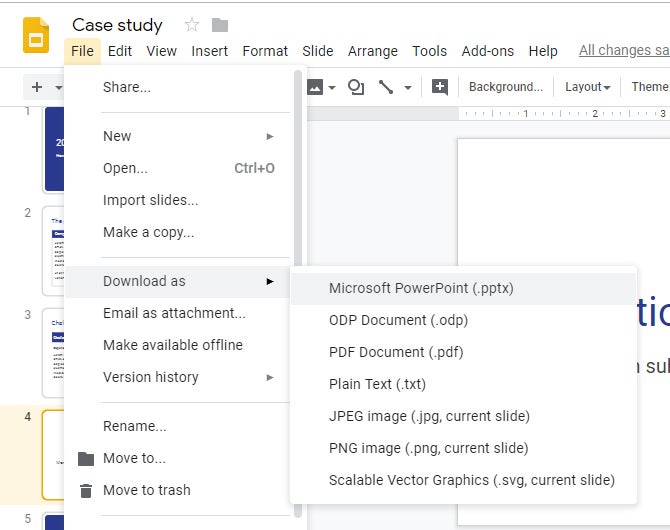
Your presentations will remain stored in Google Drive for as long as you want them to, but there are times when you’ll want to download them for use offline. When you download a presentation, you can choose to convert it to PowerPoint (.pptx) format or one of six other formats, including PDF.
On the top menu, select File > Download as and choose a file format. The presentation will be saved to your PC’s hard drive in that format.
 IDG
IDGDownloading and converting a presentation to Microsoft PowerPoint format.
Of course, a big reason to download and save a file in PowerPoint format is to send it to colleagues who use PowerPoint instead of Slides. But if you’ve already been working on a document in .pptx format and don’t need to download it to your hard drive, you can simply select File > Email as attachment and send it directly to one or more colleagues.
Use the Google Slides mobile app
The Google Slides mobile app for Android and iOS (in iPhone and iPad versions) is handy for previewing your presentations, making quick edits to them or following up on your collaborators’ comments. Any changes you make to your presentation are automatically saved and will appear the next time you open it in the Google Slides web app.
With the exception of the Explore and Version history tools, the mobile app has many of the same features described in this guide. You can even share presentations and work on them with other people through the mobile app. (See “How to share from the Google Drive, Docs, Slides and Slides mobile apps” in our Google Drive guide.)
IDG
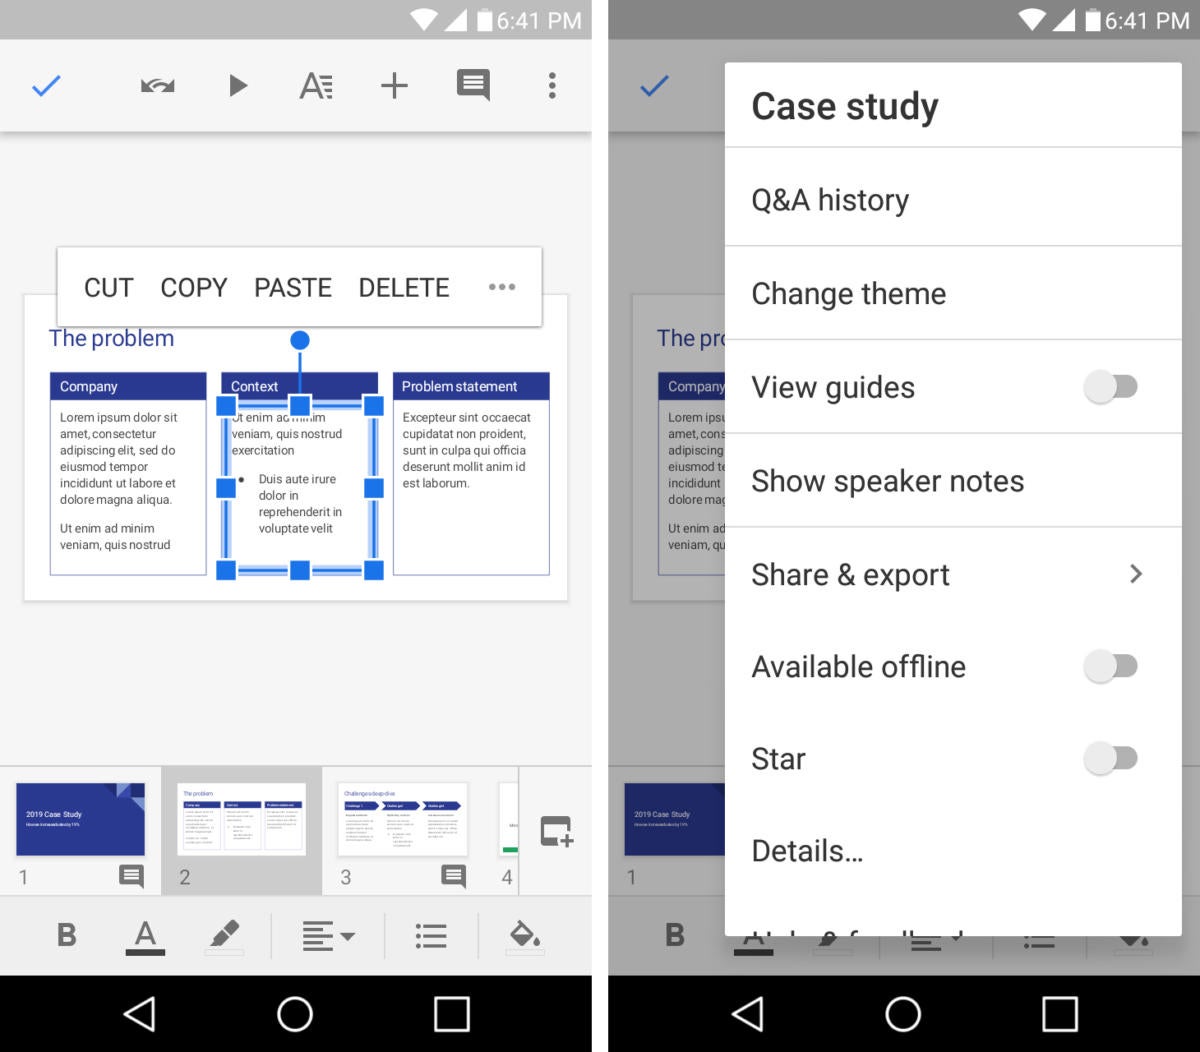
The Google Slides Android app. (Click image to enlarge it.)
A toolbar along the top lets you take actions such as playing your presentation as a slideshow, sharing it with others, and adding comments. A navigation bar along the bottom shows thumbnails of the slides in your presentation; tap a thumbnail to view the slide in the main window. Click the three-dot icon at the upper-right corner to access your presentation’s Q&A history, change its layout theme, or show speaker notes for it. Tapping an image or text on a slide brings up new top and bottom toolbars that let you adjust the appearance of the selected image or the formatting of the text.
Use keyboard shortcuts
Save time in Google Slides by using keyboard shortcuts for common tasks. Here’s a handful of the most useful shortcuts below. (Mac users, substitute the “Cmd” or ⌘ key for “Ctrl” And the “Option” key for “Alt” unless a separate Mac shortcut is noted.)
Handy Google Slides shortcuts
You can discover more shortcuts by selecting Help > Keyboard shortcuts from the top menu when you have a presentation open in Google Slides.
Credit: Howard Wen, Computerworld


Its like you read my mind! You seem to know so much about
this, like you wrote the book in it or something.
I think that you could do with a few pics to drive the message home a bit,
but instead of that, this is great blog. A fantastic read.
I’ll certainly be back.
Visit my web site; 토토수색대
Thanks for your observation and contribution. It’s highly appreciated.
Thank you.
I’m not sure why but this weblog is loading very slow for me.
Is anyone else having this issue or is it a problem
on my end? I’ll check back later on and see if the problem
still exists.
Visit my web page – 먹튀검증
Thanks for the observation. It’s possibly a network issue from your end.
Please do let us if it continues.
-Web Administrator.
I think this is among the most vital info for me.
And i am glad reading your article. But want to remark on few general things,
The website style is perfect, the articles is really great : D.
Good job, cheers
Check out my web blog 먹튀사이트
Wow, amazing weblog format! How long have you been blogging for?
you make blogging look easy. The overall glance of your website is excellent,
as neatly as the content material!
Also visit my web blog 토토가든 [Dolly]
Howdy would you mind letting me know which webhost you’re
using? I’ve loaded your blog in 3 different
web browsers and I must say this blog loads a lot quicker then most.
Can you suggest a good internet hosting provider at a honest price?
Kudos, I appreciate it!
Feel free to surf to my homepage: 카지노사이트
Hello dear,
We’ll recommend our host to you. They offer a very great package, with a number of discounted options.
With the link below, you’ll get a 20% discount:
https://www.hostinger.com/cart?product=hosting%3Ahostinger_business&period=12&referral_type=cart_link&REFERRALCODE=NHUECOBINUWV&referral_id=0194b88e-3ea4-72f4-b250-74028fba574a
Good luck.
Wonderful beat ! I wish to apprentice while you amend
your website, how could i subscribe for a blog website?
The account aided me a acceptable deal. I had been tiny bit acquainted of
this your broadcast offered bright clear idea
Here is my webpage; 신용카드현금화
There is certainly a lot to know about this topic.
I love all of the points you made.
Do you have any video of that? I’d want to find out
some additional information.
My blog post :: 토토수색대
I am really impressed with your writing skills and also with the layout on your
weblog. Is this a paid theme or did you modify it yourself?
Anyway keep up the excellent quality writing, it’s rare to see a nice
blog like this one today.
my web blog; 토토일주
I enjoy reading through an article that can make people think.
Also, thanks for allowing me to comment!
Feel free to surf to my page :: 슬롯사이트
whoah this blog is great i really like studying your articles.
Stay up the good work! You already know, many individuals are
searching around for this information, you can help them
greatly.
my web page :: 토토사이트
Does your site have a contact page? I’m having a tough
time locating it but, I’d like to send you an email.
I’ve got some recommendations for your blog you might be interested in hearing.
Either way, great site and I look forward to seeing it expand over time.
Feel free to surf to my page; 토토사이트
I got this site from my pal who shared with me regarding this web site and now this time I
am visiting this web site and reading very informative
posts here.
Feel free to surf to my blog: 토토컴퍼스